
You’re a Sitecore developer and want to know how to implement the website(s) using Sitecore Experience Accelerator 1.8 Initial Release (aka SXA 1.8.0) on Sitecore Experience Platform 9.1 Initial Release (aka Sitecore XP 9.1.0) and following Helix principles.
If that is the case, you should set up Sitecore demo – Habitat Home – on your machine so that you’re able to play around with the Sitecore solution example and then learn something.
Setup Preresiquites
- it’s configured for HTTPS/SSL only
- Windows 10
- Visual Studio 2017 (version 15.7 or later)
- Note: Visual Studio 2017 Version 15.7 and later supports migrating a project from the packages.config management format to the PackageReference format, click here to learn more about it
- Sitecore Powershell Extensions 5.0
- Note: must log into https://dev.sitecore.net/ before downloading
- Sitecore Experience Accelerator 1.8 for Sitecore XP 9.1
- Data Exchange Framework 2.1.0
- Sitecore Provider for Data Exchange Framework 2.1.0
- SQL Provider for Data Exchange Framework 2.1.0
- xConnect Provider for Data Exchange Framework 2.1.0
- Microsoft Dynamics 365 for Sales Provider for Data Exchange Framework 2.1.0
- Sitecore Connect for Microsoft Dynamics 365 for Sales 2.1.0
- Salesforce CRM Provider for Data Exchange Framework 2.1.0
- Sitecore Connect for Salesforce CRM 2.1.0
- Url Rewrite 2.1
Step-by-step Guide
- install the ones below if not yet 😀
- a fresh Sitecore 9.1 Initial Release instance , let’s say habitathome.local and habitathome.xconnect.local (xConnect site)
- Url Rewrite 2.1
- install all required Sitecore modules below via Installation Wizard
- Sitecore Powershell Extensions 5.0
- Note: must log into https://dev.sitecore.net/ before downloading
- Sitecore Experience Accelerator 1.8 for Sitecore XP 9.1
- Data Exchange Framework 2.1.0
- Sitecore Provider for Data Exchange Framework 2.1.0
- SQL Provider for Data Exchange Framework 2.1.0
- xConnect Provider for Data Exchange Framework 2.1.0
- Microsoft Dynamics 365 for Sales Provider for Data Exchange Framework 2.1.0
- Sitecore Connect for Microsoft Dynamics 365 for Sales 2.1.0
- Salesforce CRM Provider for Data Exchange Framework 2.1.0
- Sitecore Connect for Salesforce CRM 2.1.0
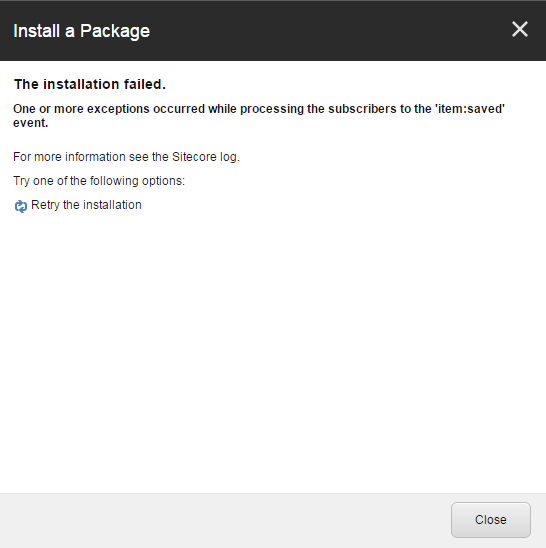
- Note 1: if you don’t follow the order above strictly, you will see something like this
- Note 2: you’re able to overcome it by reinstalling the failed one with Overwrite option
- publish your Sitecore Instance
- download or clone the git repo from Habitat Home version 9.1.0.3
- ensure that you create an HTTPS binding with appropriate self-signed certificate
- Note 1: you can try creating the self-signed certificate and assign it to your site if not yet by executing the following PowerShell script
- launch PowerShell as an administrator
-
Add-WebFeatureSSL -HostName “habitathome.local” -RootDnsName “DO_NOT_TRUST_SitecoreDemo”
- Note 2: if you see something like New-SelfSignedCertificate : CertEnroll::CX509Enrollment::_CreateRequest: The time period is invalid. 0x80630705, you will have to use the new root certificate (Ex: DO_NOT_TRUST_NewSitecoreDemo)
- Note 3: if you see something like The term ‘Add-WebFeatureSSL’ is not recognized as the name of a cmdlet, function, script file, or operable program you will have to execute Install-Module SitecoreFundamentals
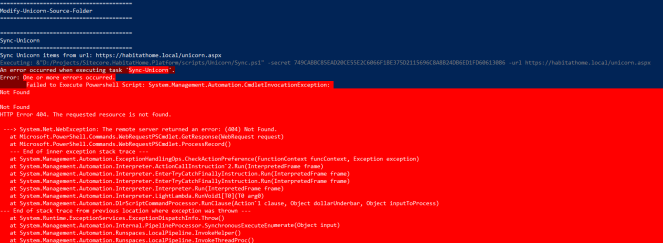
- otherwise, you’re gonna see the following issue later when performing “Sync-Unicorn” task
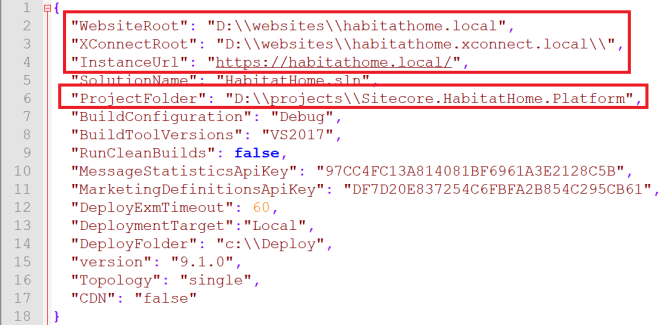
- Note: I don’t want to use the default settings so I need to adjust the appropriate values in cake-config.json
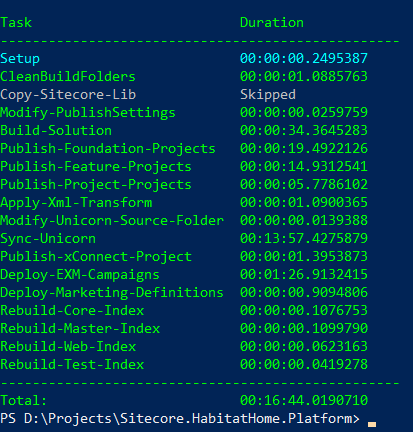
- deploy Sitecore.HabitatHome.Platform
- launch PowerShell as an administrator
- change directory to \Sitecore.HabitatHome.Platform
- execute .\build
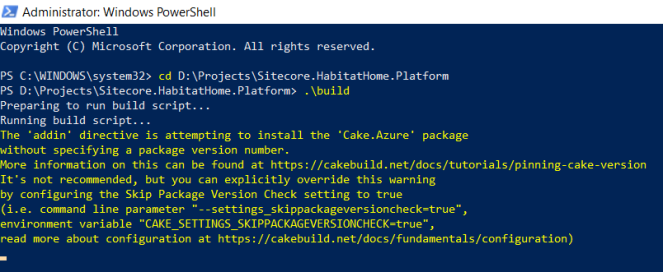
- hopefully everything runs well and then you would see something like this
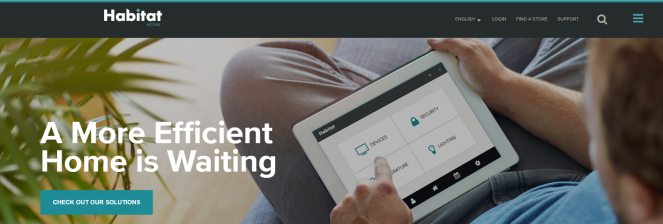
- open a browser and then navigate to https://habitathome.local, you would see something like this
- Note: you may see the default page of Sitecore website. That’s because you don’t use the host name habitathome.local so you need to correct it in Sitecore
- log into https://habitathome.local/sitecore (Note: you may get Known Issue #1 below)
- open Desktop -> PowerShell Toolbox -> SXA Site Manager dialog
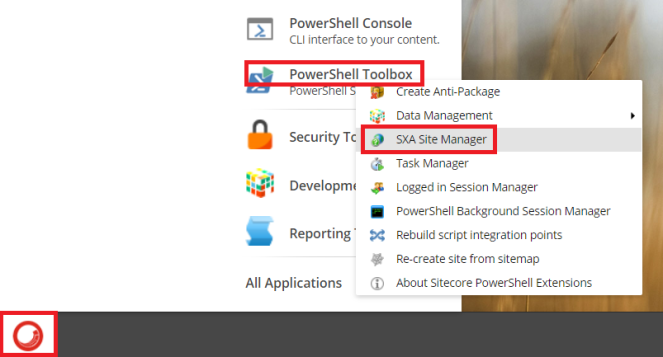
- select HabitatHome row and then click Open button on the top-right of SXA Site Manager dialog
- update Host Name field to habitathome.local and Database field to master then click OK button to save
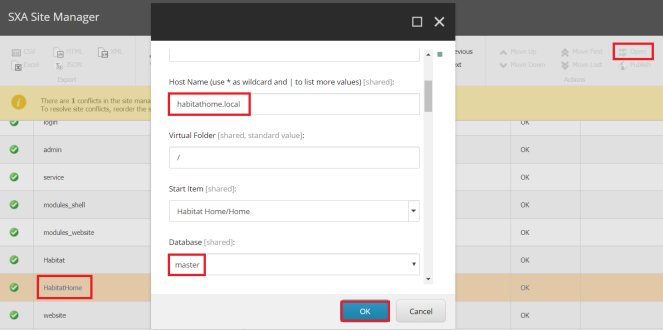
- refresh https://habitathome.local
Note: some known issues
- Sorry, there was an error : unauthorized_client
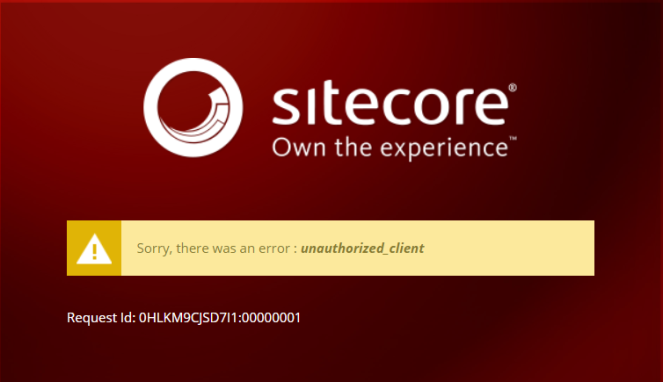
- my suggestion: ensure that there is https://habitathome.local in AllowCorsOrigins setting of your Sitecore Identity Server site
- open \habitathome.identityserver.local\Config\production\Sitecore.IdentityServer.Host.xml and then correct it

- (optional) add a new AllowCorsOriginsGroup to that file like this

- DON’T FORGET to do IIS reset
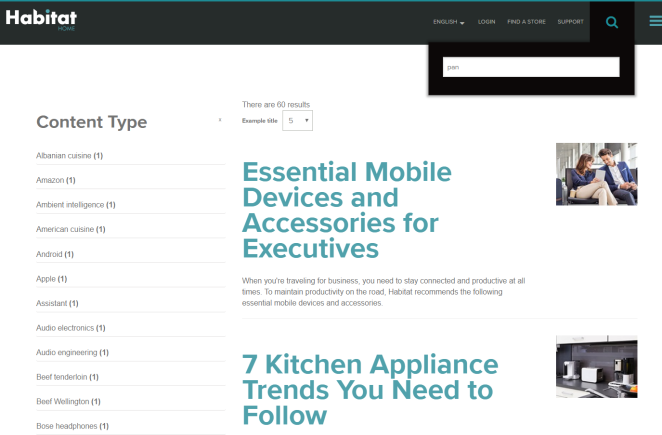
- Search function does NOT work as expected: No results
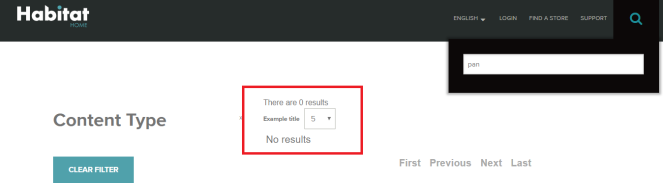
- my suggestion: ensure to perform “Create SOLR SXA cores” step (page 2 – 5) in SXA 1.8 Installation Guide (Note: must log into https://dev.sitecore.net/ before downloading) and then you would see something like this
Got issues?
Please send your issues (with screenshots if possible) to viet.hoang.sitecore@gmail.com so that I have a chance to understand your problem and be able to suggest the solution.
Happy Sitecore Demo Installation!

Thanks for doing this Viet – Muc appreciated
LikeLiked by 1 person
You’re welcome! It’s my pleasure to do it 🙂
LikeLike
Thank you for putting all the details I manged to get it done quickly.
LikeLiked by 1 person
It’s very helpful Viet. Do you have any best practice to implement SXA for large-scale projects?
LikeLiked by 1 person
It’s out of my experience so you may want to figure it out via https://tothecore.sk/2019/05/27/sitecore-sxa-learning-resouces-getting-started-with-sxa/ (especially for some notable Sitecore SXA bloggers)
LikeLike