
You’re a Sitecore developer and want to know how to implement the website(s) using Sitecore Experience Accelerator 1.8 Update 1 (aka SXA 1.8.1) on Sitecore Experience Platform 9.1 Update 1 (aka Sitecore XP 9.1.1) and following Helix principles.
If that is the case, you should set up Sitecore demo – Habitat Home – on your machine so that you’re able to play around with the Sitecore solution example and then learn something.
Setup Preresiquites
- it’s configured for HTTPS/SSL only
- Windows 10
- Visual Studio 2017 (version 15.7 or later)
- Note: Visual Studio 2017 Version 15.7 and later supports migrating a project from the packages.config management format to the PackageReference format, click here to learn more about it
- Sitecore Powershell Extensions 5.0
- Note: must log into https://dev.sitecore.net/ before downloading
- Sitecore Experience Accelerator 1.8.1 for Sitecore XP 9.1.1
- Data Exchange Framework 2.1.0
- Sitecore Provider for Data Exchange Framework 2.1.0
- SQL Provider for Data Exchange Framework 2.1.0
- xConnect Provider for Data Exchange Framework 2.1.0
- Microsoft Dynamics 365 for Sales Provider for Data Exchange Framework 2.1.0
- Sitecore Connect for Microsoft Dynamics 365 for Sales 2.1.0
- Salesforce CRM Provider for Data Exchange Framework 2.1.0
- Sitecore Connect for Salesforce CRM 2.1.0
- Url Rewrite 2.1
Step-by-step Guide
- install the ones below if not yet 😀
- a fresh Sitecore XP 9.1.1 instance , let’s say habitathome.local and habitathome.xconnect.local (xConnect site)
- Url Rewrite 2.1
- install all required Sitecore modules below via Installation Wizard
- Sitecore Powershell Extensions 5.0
- Note: must log into https://dev.sitecore.net/ before downloading
- Sitecore Experience Accelerator 1.8.1 for Sitecore XP 9.1.1
- Data Exchange Framework 2.1.0
- Sitecore Provider for Data Exchange Framework 2.1.0
- SQL Provider for Data Exchange Framework 2.1.0
- xConnect Provider for Data Exchange Framework 2.1.0
- Microsoft Dynamics 365 for Sales Provider for Data Exchange Framework 2.1.0
- Sitecore Connect for Microsoft Dynamics 365 for Sales 2.1.0
- Salesforce CRM Provider for Data Exchange Framework 2.1.0
- Sitecore Connect for Salesforce CRM 2.1.0
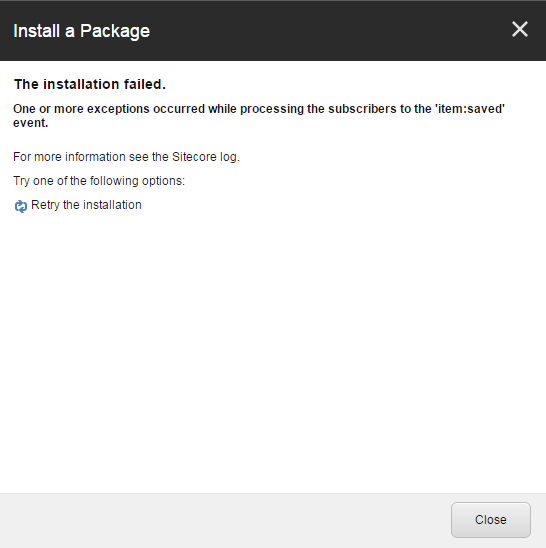
- Note 1: if you don’t follow the order above strictly, you will see something like this
- Note 2: you’re able to overcome it by reinstalling the failed one with Overwrite option
- publish your Sitecore Instance
- download or clone the git repo from Habitat Home Platform 9.1.1
- ensure that you create an HTTPS binding with appropriate self-signed certificate
- Note 1: you can try creating the self-signed certificate and assign it to your site if not yet by executing the following PowerShell script
- launch PowerShell as an administrator
-
Add-WebFeatureSSL -HostName “habitathome.local” -RootDnsName “DO_NOT_TRUST_SitecoreDemo”
- Note 2: if you see something like New-SelfSignedCertificate : CertEnroll::CX509Enrollment::_CreateRequest: The time period is invalid. 0x80630705, you will have to use the new root certificate (Ex: DO_NOT_TRUST_NewSitecoreDemo)
- Note 3: if you see something like The term ‘Add-WebFeatureSSL’ is not recognized as the name of a cmdlet, function, script file, or operable program you will have to execute Install-Module SitecoreFundamentals
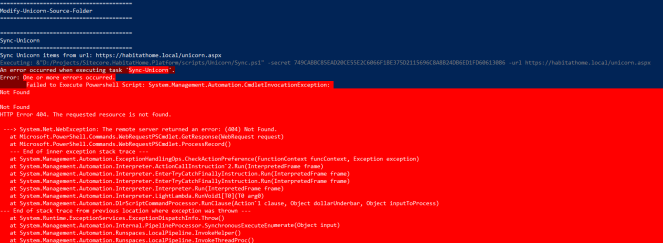
- otherwise, you’re gonna see the following issue later when performing “Sync-Unicorn” task
- Note: I don’t want to use the default settings so I need to adjust the appropriate values in cake-config.json
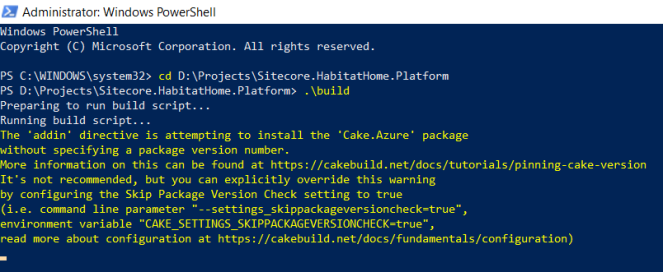
- deploy Sitecore.HabitatHome.Platform
- launch PowerShell as an administrator
- change directory to \Sitecore.HabitatHome.Platform
- execute .\build
- Note: you may get the following error while build task “Sync-Unicorn” is publishing items in queue to web , just execute .\build -Target “Post-Deploy” to resolve it
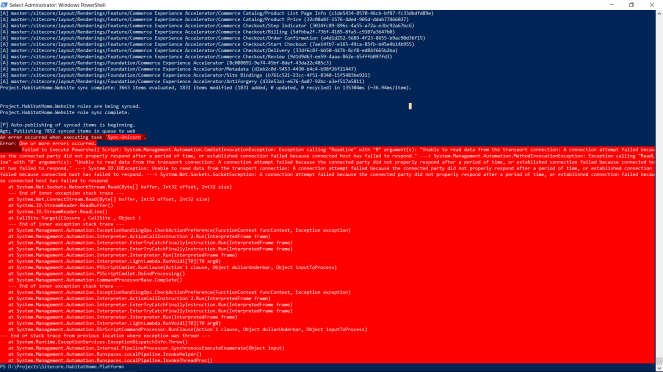
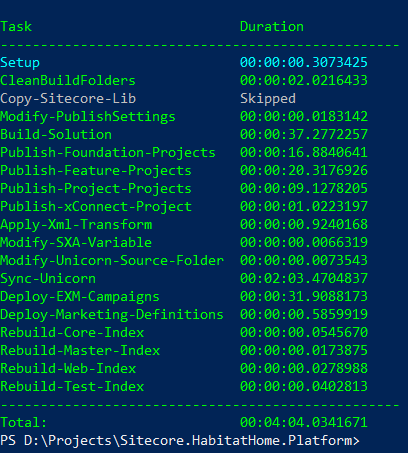
- hopefully everything runs well and then you would see something like this
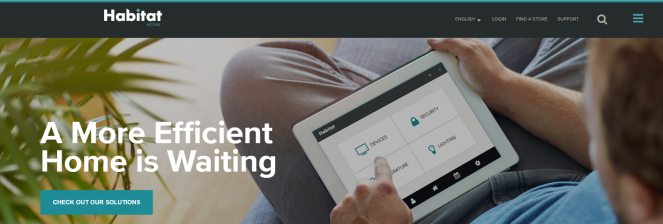
- open a browser and then navigate to https://habitathome.local, you would see something like this
- Note: you may see the default page of Sitecore website. That’s because you don’t use the host name habitathome.local so you need to correct it in Sitecore
- log into https://habitathome.local/sitecore (Note: you may get Known Issue #1 below)
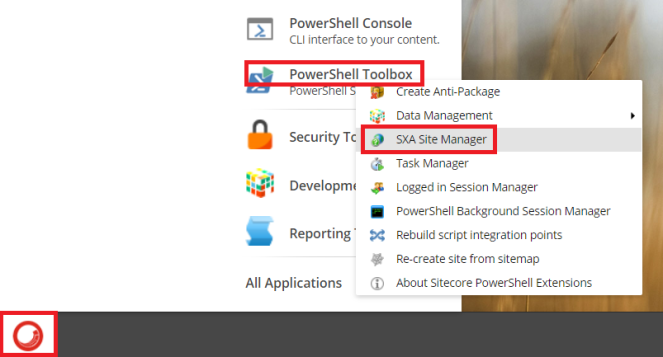
- open Desktop -> PowerShell Toolbox -> SXA Site Manager dialog
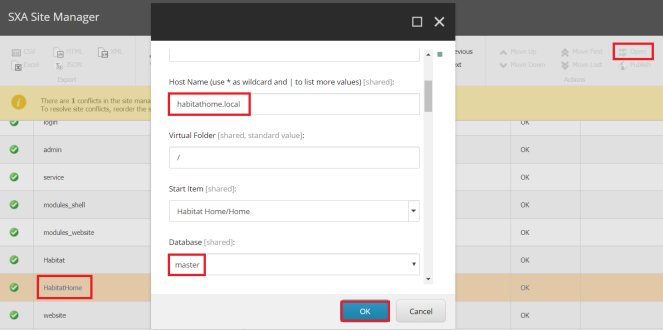
- select HabitatHome row and then click Open button on the top-right of SXA Site Manager dialog
- update Host Name field to habitathome.local and Database field to master then click OK button to save
- refresh https://habitathome.local

Note: some known issues
- Sorry, there was an error : unauthorized_client

- my suggestion: ensure that there is https://habitathome.local in AllowCorsOrigins setting of your Sitecore Identity Server site
- open \habitathome.identityserver.local\Config\production\Sitecore.IdentityServer.Host.xml and then correct it

- (optional) add a new AllowCorsOriginsGroup to that file like this

- DON’T FORGET to do IIS reset
- Search function does NOT work as expected: No results
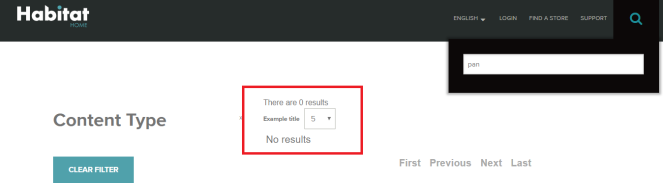
- my suggestion: ensure to perform “Create SOLR SXA cores” step (page 2 – 5) in SXA 1.8.1 Installation Guide (Note: must log into https://dev.sitecore.net/ before downloading) and then you would see something like this

Got issues?
Please send your issues (with screenshots if possible) to viet.hoang.sitecore@gmail.com so that I have a chance to understand your problem and be able to suggest the solution.
Happy Sitecore Demo Installation!

5 thoughts on “Sitecore XP 9.1.1 and SXA 1.8.1 Demo – Habitat Home – Step by step Setup Guide”