Update (03-May-2020): we can run Sitecore Commerce 9.3.0 on Docker environment as well
This one is a summary of my own experience for Sitecore Experience Commerce 9.3 Initial Release (aka Sitecore XC 9.3.0) installation on my machine. I’ve had much experience in the following ones:
- Sitecore XC9 installation
- Sitecore XC9 Update 1 installation
- Sitecore XC9 Update 2 installation
- Sitecore XC9 Update 3 installation
- Sitecore XC 9.1 Initial Release installation
- Sitecore XC 9.2 Initial Release installation
so I decided to go only with:
- Installation Guide – WDP for On Premise (Thanks Sitecore team!)
I do hope that this blog post is helpful for your own journey as well.
Note: personally, I wanted to use my own install directory rather than the default one
Setup Prerequisites
Please refer to the Sitecore Experience Commerce 9 Compatibility Table for the software and version prerequisites:
- Windows 10
- Sitecore Experience Platform 9.3 Initial Release
- Sitecore PowerShell Extension for Sitecore 9.3 (Note: must log into https://dev.sitecore.net/ before downloading)
- Sitecore Experience Accelerator for 9.3 (Note: must log into https://dev.sitecore.net/ before downloading)
- Packages for On Premise WDP 2020.01-5.0.145 (Note: must log into https://dev.sitecore.net/ before downloading)
- Redis 3.0.504
Step-by-step guide
- install the ones below if not yet 😀
- a fresh Sitecore XP 9.3 Initial Release instance , let’s say storefront930.local and storefront930.xconnect.local (xConnect site)
- download and install Redis 3.0.504
- rebuild the Link databases for the master and core databases if not yet:
- on the Sitecore Launchpad, click Control Panel, and in the Database section, click Rebuild Link Databases
- select the master and core databases and then click Rebuild

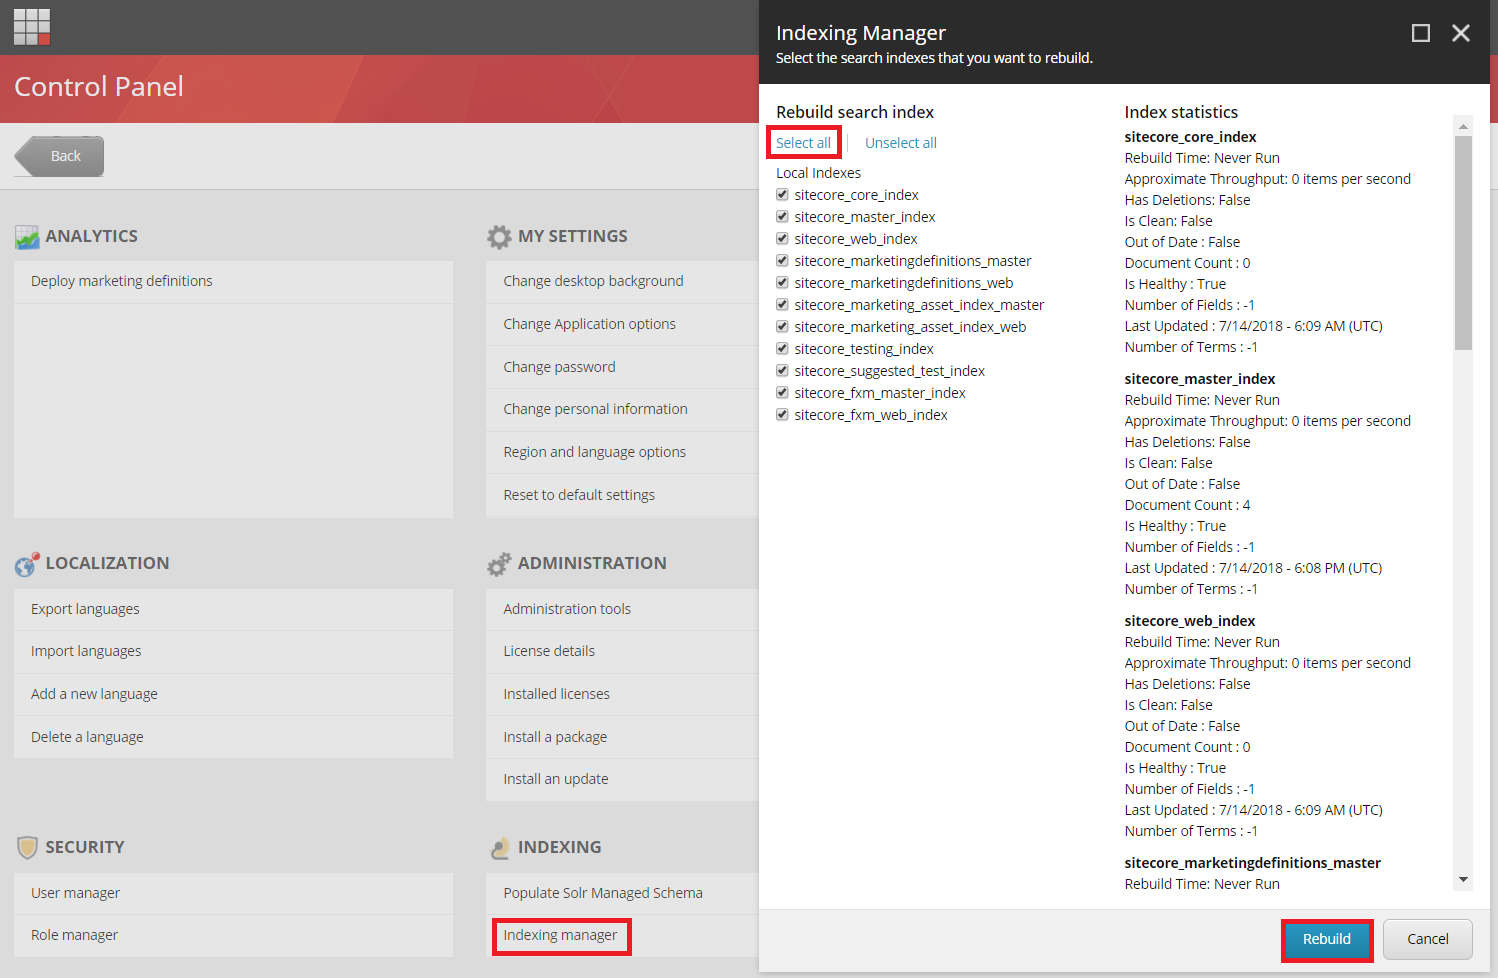
- rebuild the search indexes if not yet:
- on the Sitecore Launchpad, click Control Panel, and in the Indexing section, click Indexing manager
- in the Indexing Manager dialog box, click Select all, and then click Rebuild
- ensure that Experience Analytics is working properly
- Note: if there is any error
- option 1: you will have to solve it before installing XC by opening the Sitecore log and then having a look at the error messages (normally, they’re certificate issues)
- option 2: you may want to disable xDB and then fix the error later after installing XC successfully
- create a new folder D:\sc930_com_install
- download MSBuild Microsoft Visual Studio Web targets (available from Nuget) then extract the Web targets package, copy the \tools\VSToolsPath\Web\Microsoft.Web.XmlTransform.dll file into D:\sc930_com_install
- download Sitecore PowerShell Extension for Sitecore 9.3 (Note: must log into https://dev.sitecore.net/ before downloading) and put it into D:\sc930_com_install
- download Sitecore Experience Accelerator for 9.3 (Note: must log into https://dev.sitecore.net/ before downloading) and put it into D:\sc930_com_install
- download and unzip Packages for On Premise WDP 2020.01-5.0.145 (Note: must log into https://dev.sitecore.net/ before downloading) then put it into D:\sc930_com_install
- unzip D:\sc930_com_install\SIF.Sitecore.Commerce.4.0.31.zip and then rename D:\sc930_com_install\SIF.Sitecore.Commerce.4.0.31.zip to D:\sc930_com_install\SIF for a better practice
- override the following files in order to inject the custom install directory of Commerce’s sites
- open raw and then copy / paste Master_SingleServer.json into D:\sc930_com_install\SIF\Configuration\Commerce

- open raw and then copy / paste CommerceEngine.json into D:\sc930_com_install\SIF\Configuration\Commerce\CommerceEngine
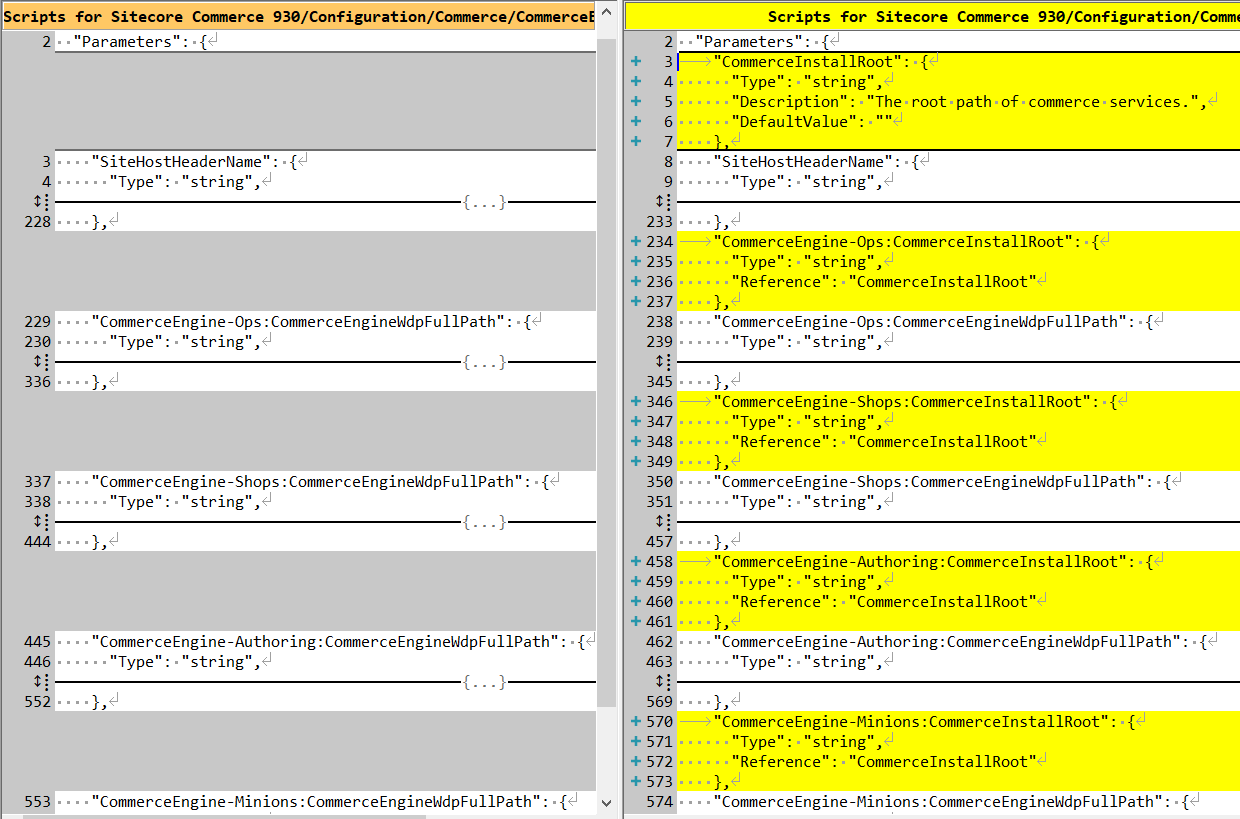
- open raw and then copy / paste CommerceEngine.Instance.Deploy.json into D:\sc930_com_install\SIF\Configuration\Commerce\CommerceEngine

- (optional) download + unzip Configuration.zip and then copy / paste all to D:\sc930_com_install\SIF
- download sc930_com_install.ps1 and put it into D:\sc930_com_install\SIF then open it to correct the following parameters if necessary
- $ScInstallDirectory
- $SiteNamePrefix
- $SiteHostHeaderName
- $SitecoreDbServer
- ensure using double back slash if any

- $SqlUser
- $SqlPass
- $SolrUrl
- $SolrRoot
- $SolrService
- $CommerceEngineConnectClientSecret: refer to Step 13 below
- deployment fails if you don’t provide a qualified value for this parameter

- (optional) create a secret client certificate
- refer to 2.3. Create a secret client certificate (Page 12) in Installation Guide – WDP for On Premise
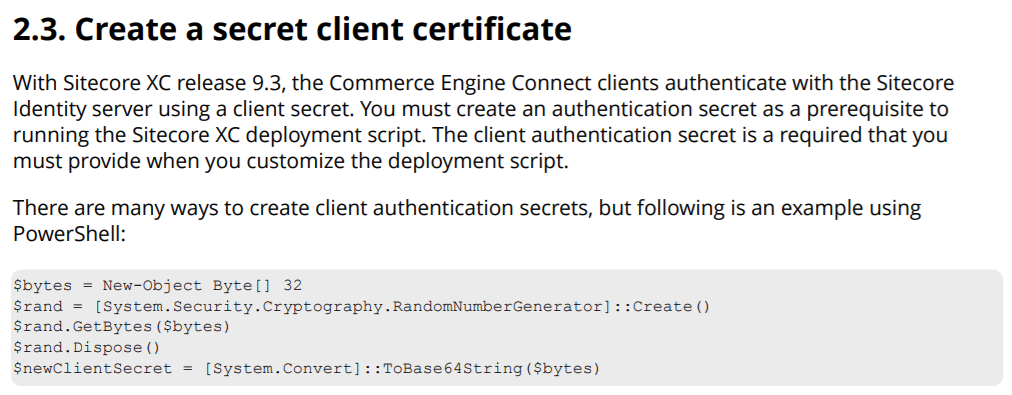
- Note: you can download the PowerShell script above here and then
- open Windows PowerShell
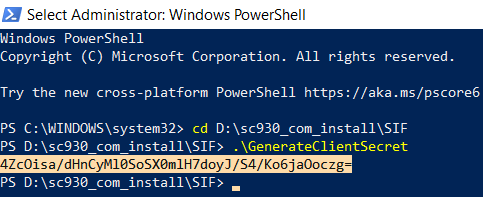
- note the generated client script and then replace the value of $CommerceEngineConnectClientSecret

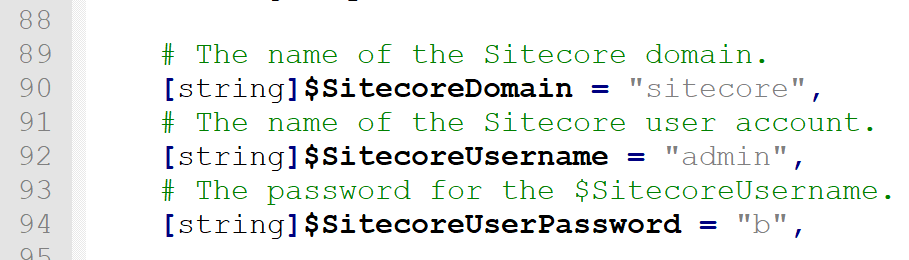
- (optional) correct the SitecoreUserName and SitecoreUserPassword of your Sitecore XP 9.3.0 instance if you’re using others rather than the default ones
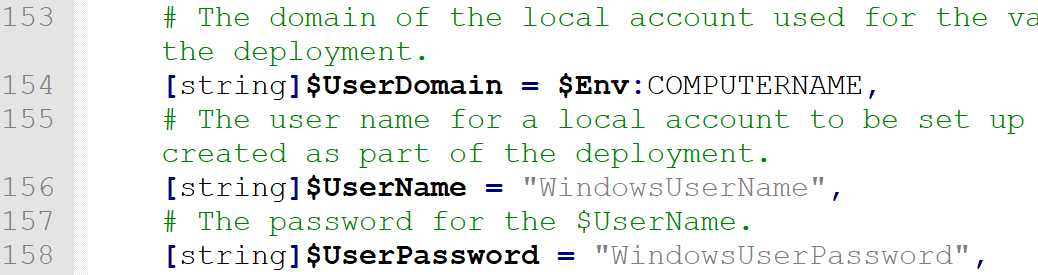
- (optional) you can specify any local account (note: it will be created automatically if non-existent) to be set up for the various application pools that are created as part of the deployment
- let’s install it
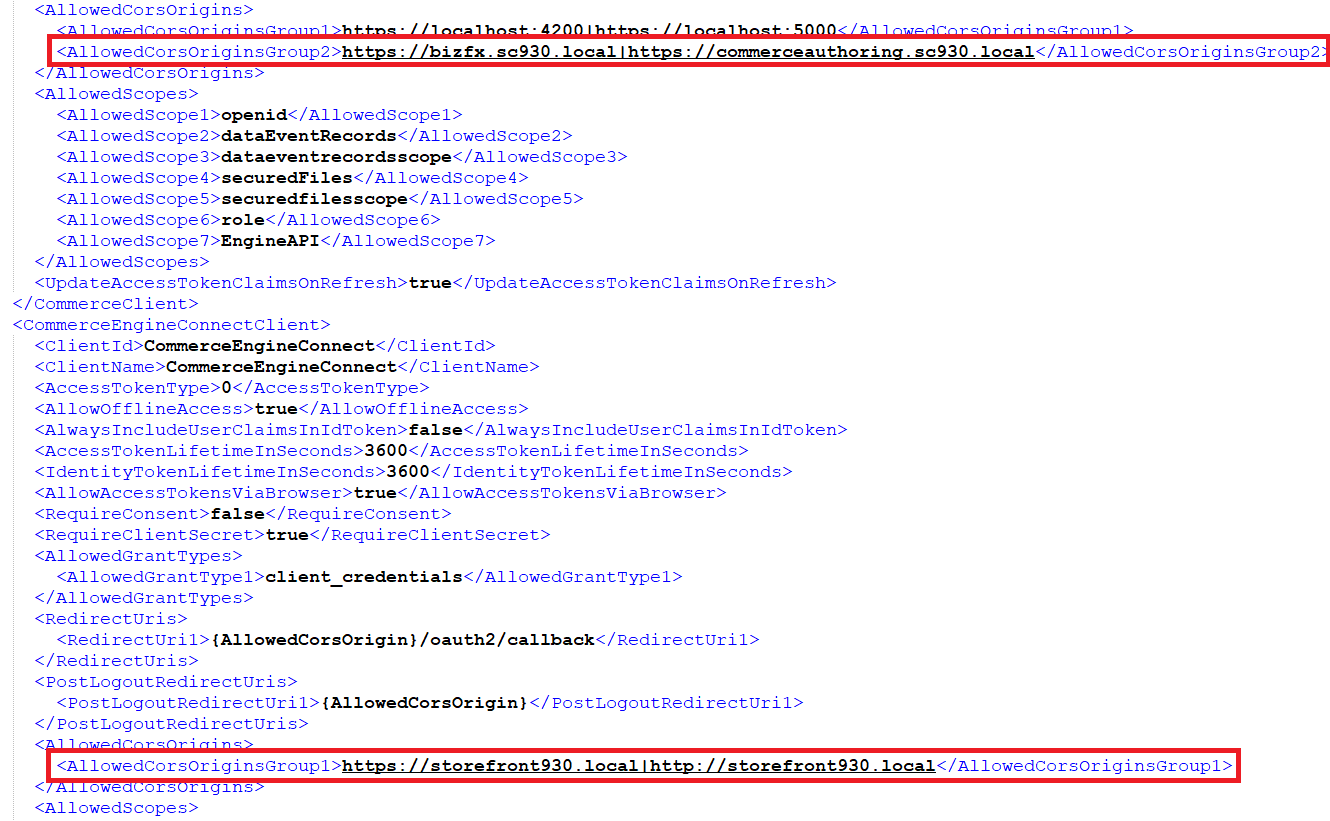
- Note: ensure that there is NO custom AllowedCorsOriginsGroup in D:\sc930_com_install\SIF\IdentityServer\Sitecore.Commerce.IdentityServer.Host.xml (they’re added automatically in prior installations)
- launch PowerShell as an administrator
- change directory to D:\sc930_com_install\SIF
- execute .\sc930_com_install
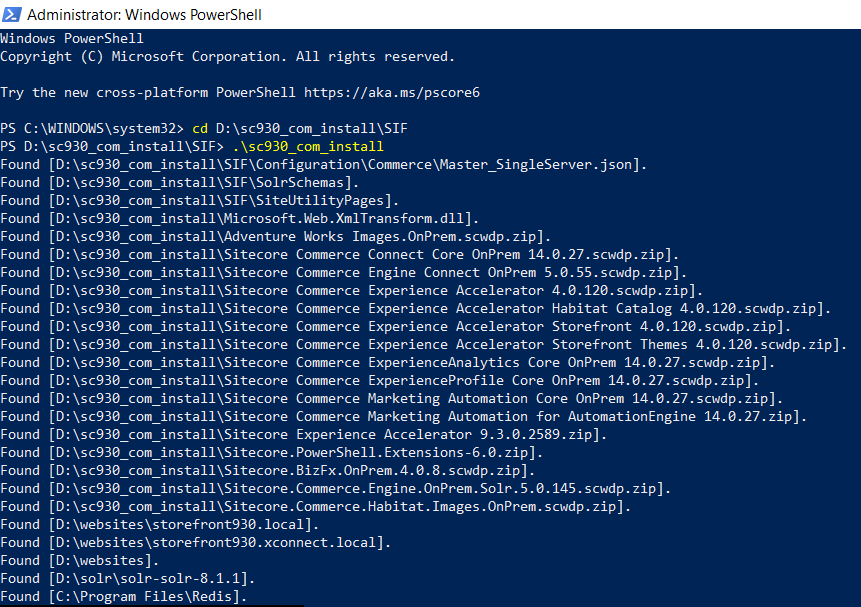
- hopefully there is nothing can stop the installation process now
- open a browser then navigate to https://storefront930.local/, you would see the default page of Sitecore website. That’s because we don’t use the default host name sxa.storefront.com so we need to correct it via Sitecore
- log into https://storefront930.local/sitecore/
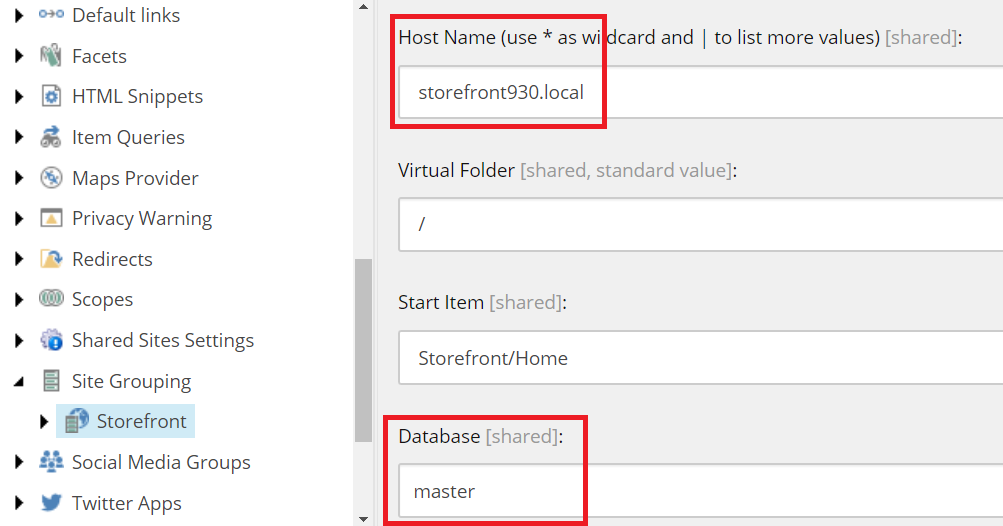
- access /sitecore/content/Sitecore/Storefront/Settings/Site Grouping/Storefront
- update Host Name to storefront930.local and Database to master
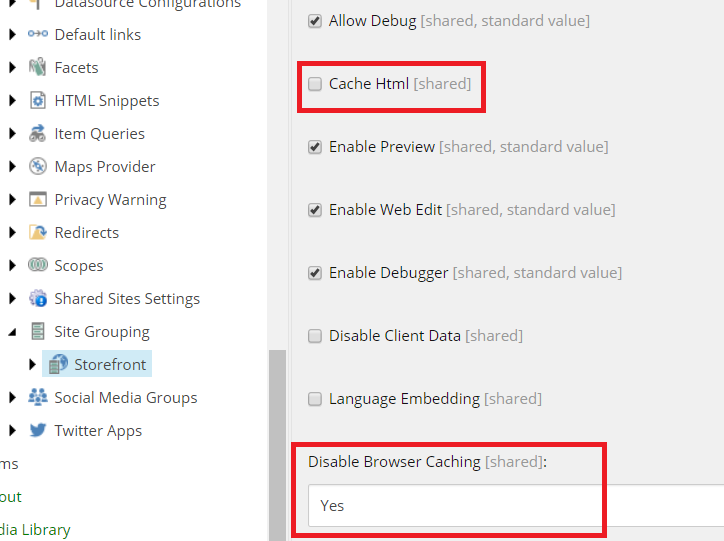
- (optional) not check the checkbox Cache Html and select Yes for Disable Browser Caching for a better practice
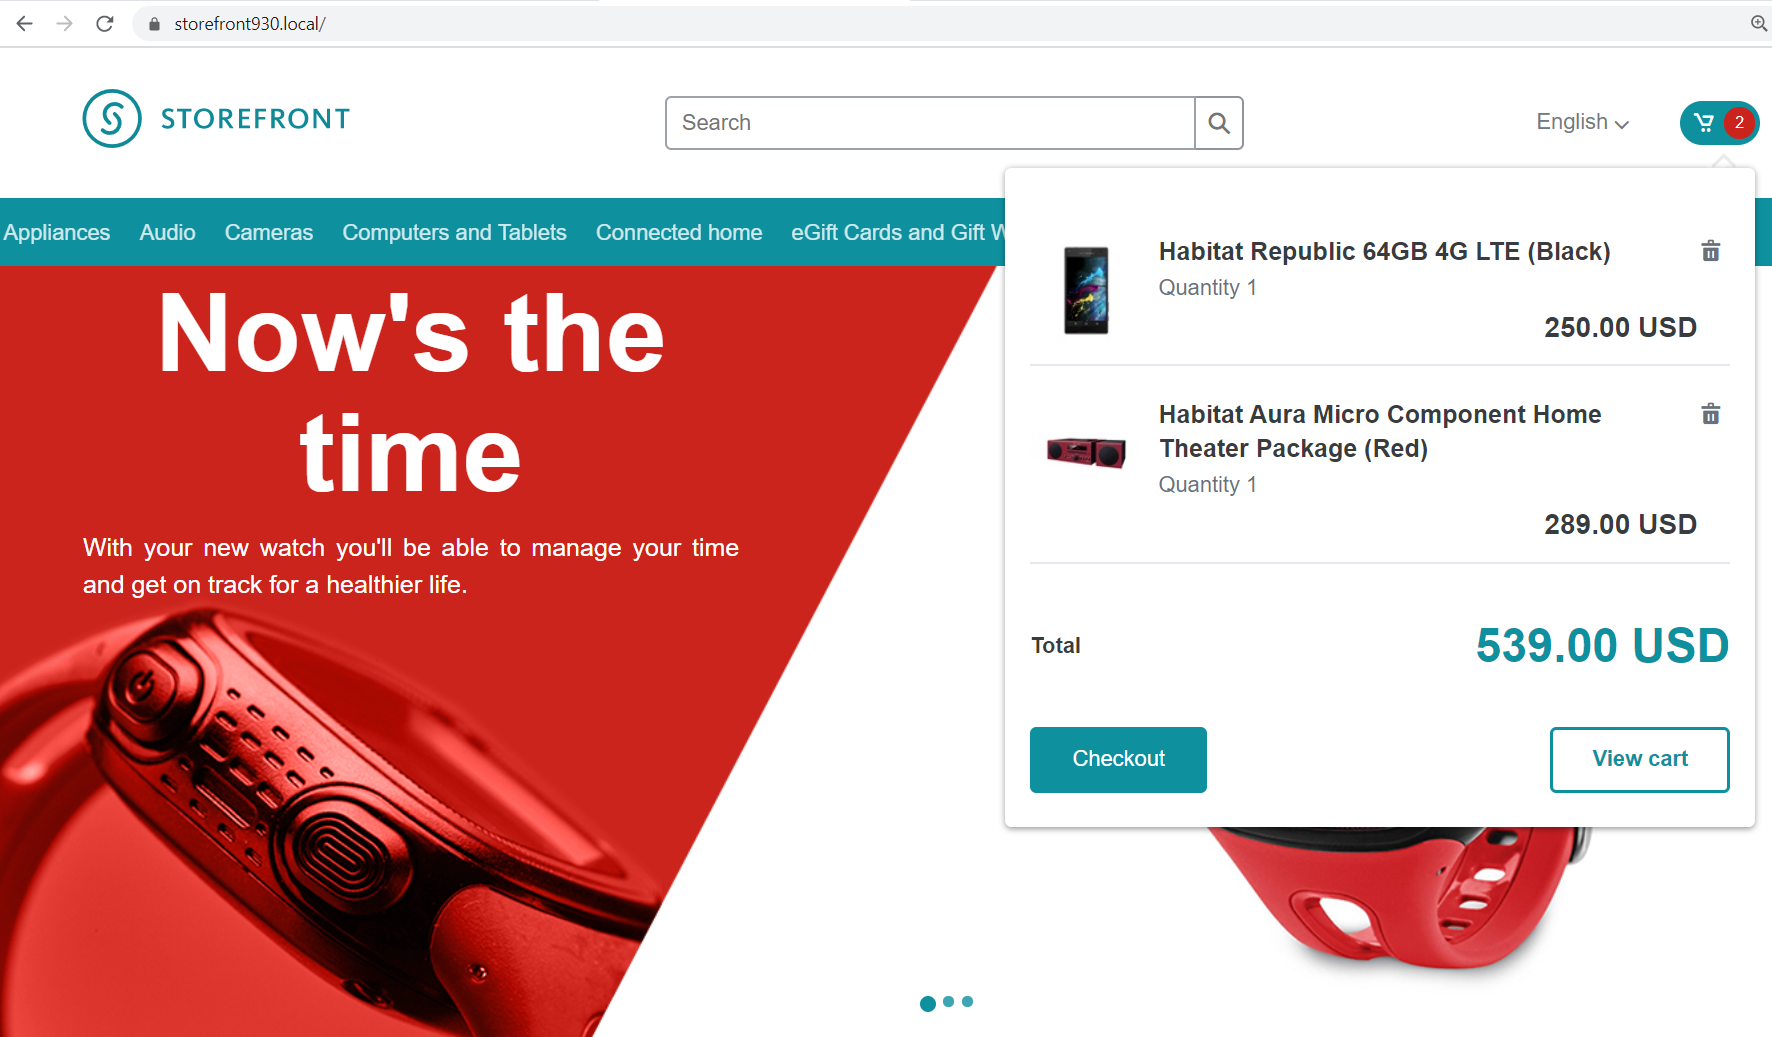
- refresh https://storefront930.local/ and then add some products, you would see something like this
- DO NOT forget to perform Post-Installation Steps
- follow Post-Installation Steps (from Page 17) in Installation Guide – WDP for On Premise
The recommendation
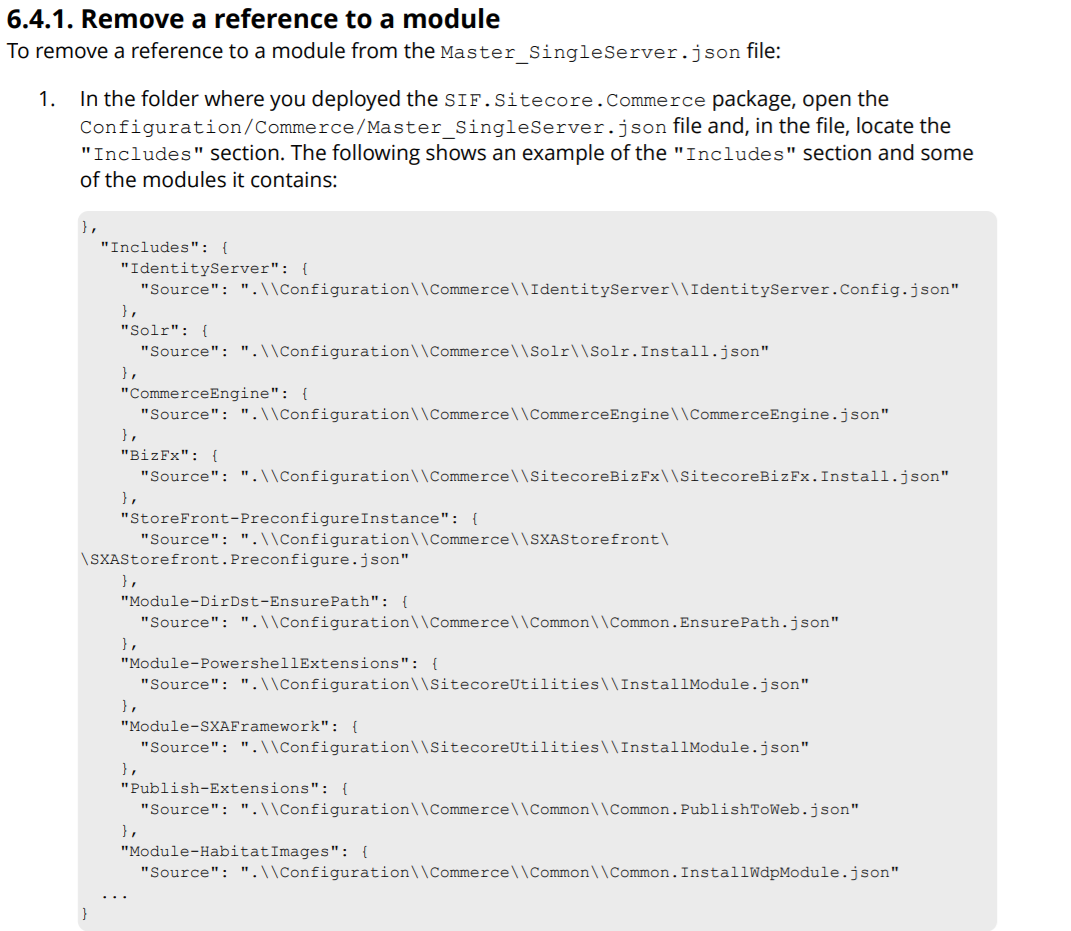
We can remove the modules completed from D:\sc930_com_install\SIF\Configuration\Commerce\Master_SingleServer.json and re-do Step 16 if there is something wrong (especially for Note: some known issues below) so that we are able to save a lot of time 😀
Likewise the following one in the installation guide:
How to uninstall it?
- open D:\sc930_com_install\SIF\sc930_com_install.ps1 and uncomment the line 296 + comment out the line 293 then save it

- Note 1: ensure using only “single back slash” in $SitecoreDbServer

- Note 2: DO NOT FORGET to restore D:\sc930_com_install\SIF\Configuration\Commerce\Master_SingleServer.json if you already edited it for removing the modules completed via the install operations
- open Windows PowerShell (run as administrator)
- change directory to D:\sc930_com_install\SIF
- execute .\sc930_com_install
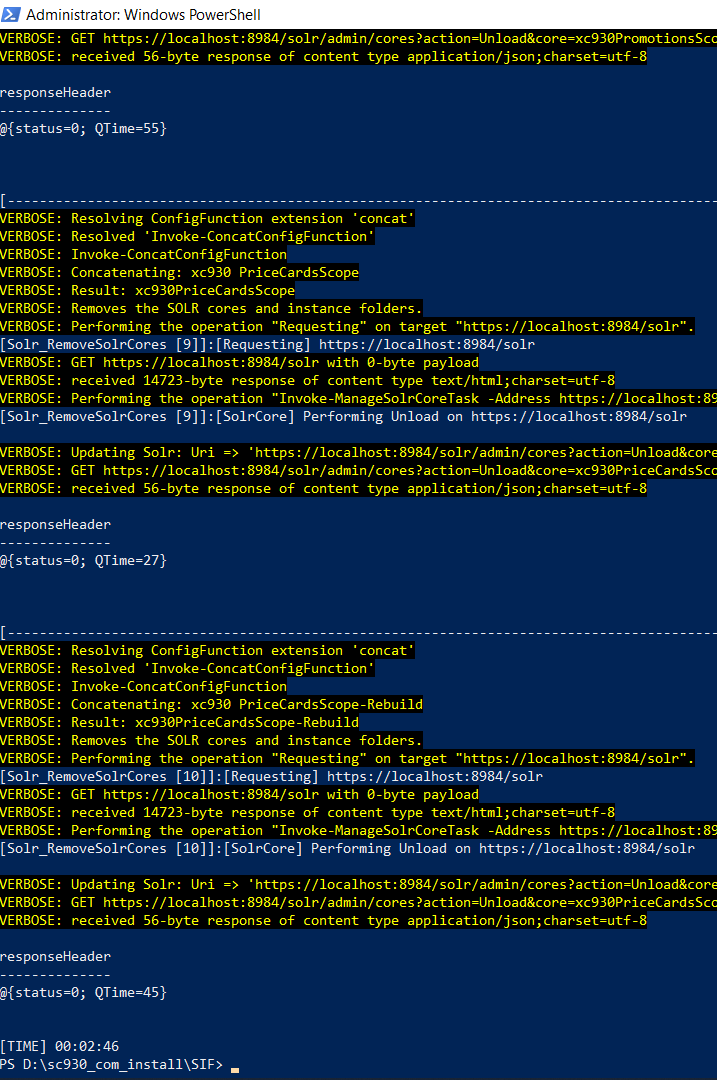
- hopefully, it runs well and cleans everything up
Note: some known issues
- The remote server returned an error : (400) Bad Request
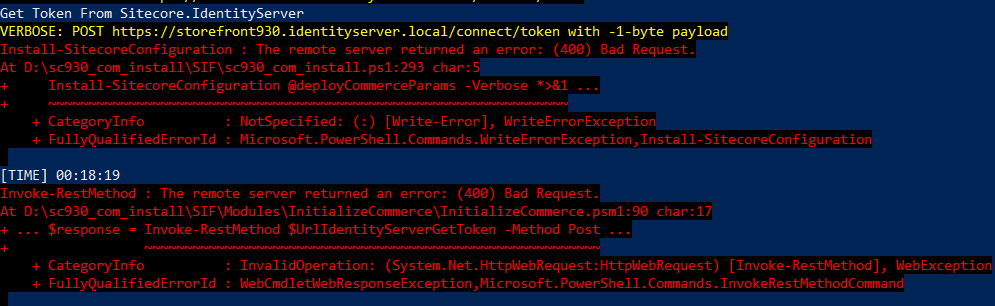
- my suggestion: try doing IIS Reset and then perform the current install step again (Note: please check The Recommendation section in this post to know how to remove the completed install steps)
- The MERGE statement attempted to UPDATE or DELETE the same row more than once
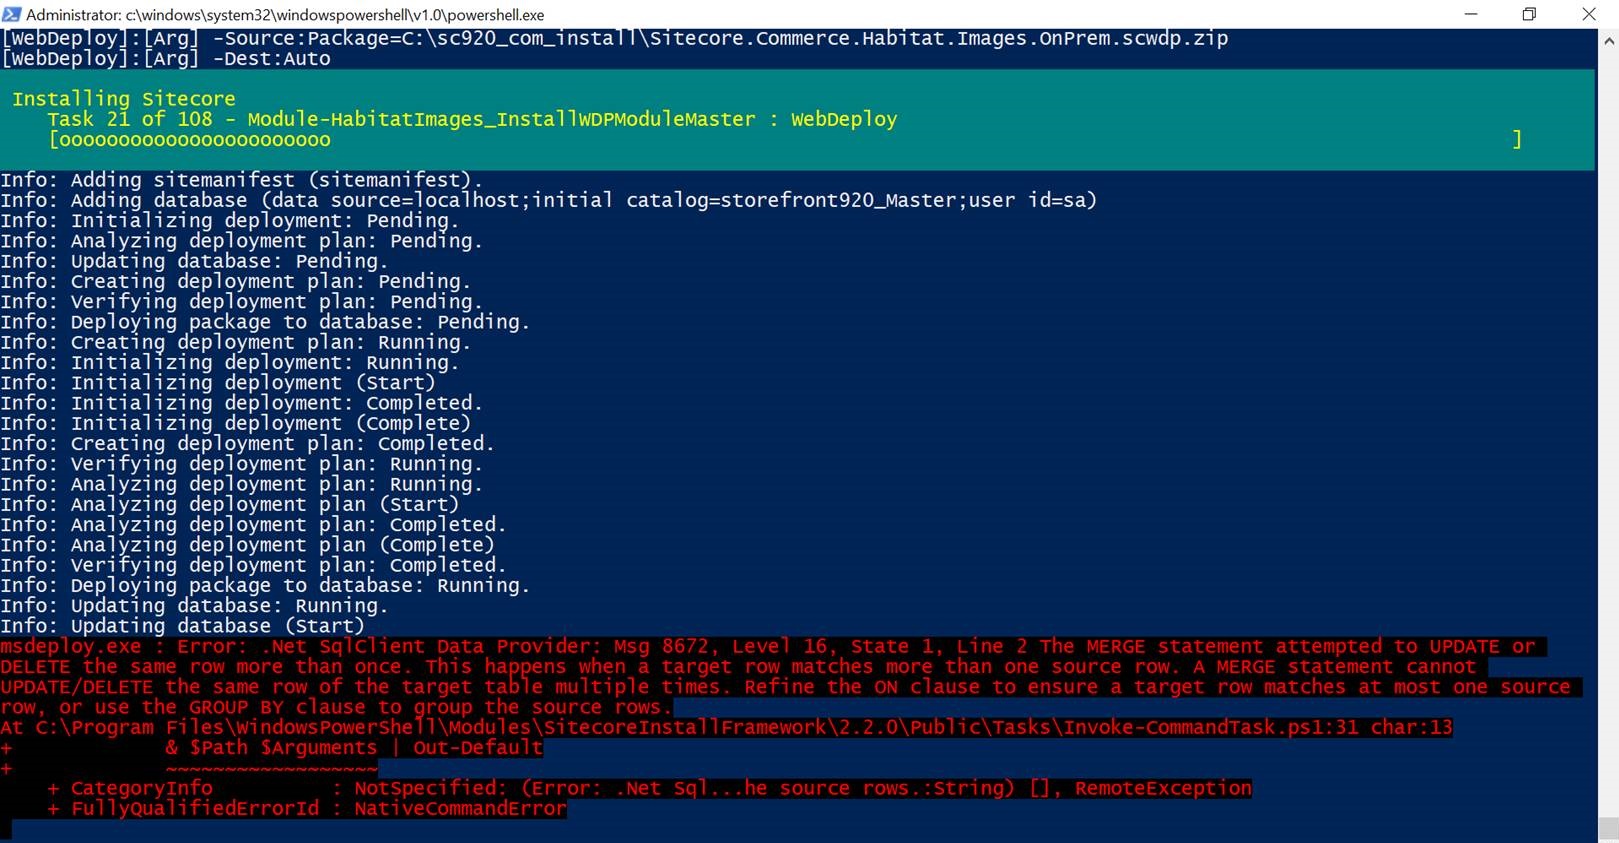
- my suggestion is to remove all prior modules completed + Module-HabitatImages task itself (in this case) from D:\sc930_com_install\SIF\Configuration\Commerce\Master_SingleServer.json and re-do Step 16
- The remote server returned an error: (500) internal server error
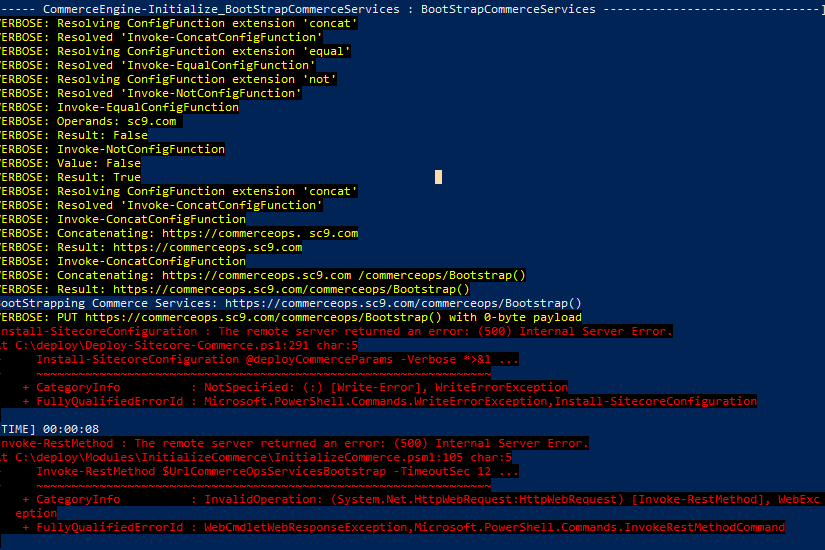
- my suggestion: ensure correcting the parameters are mentioned in Step 12
Got issues?
Please send your issues (with screenshots if possible) to viet.hoang.sitecore@gmail.com so that I have a chance to understand your problem and be able to suggest the solution.
Happy Sitecore Commerce Installation!

What do you mean please by saying “remove all prior modules completed + Module-HabitatImages task itself” ?
LikeLike
Please have a look at “The recommendation” section of this post
LikeLike
I followed all the installation steps and there was no error in the script running in PS. But, when I go to Sitecore I don’t see any SXA modules created.
For complete info, I have sent you the output of running the script and screenshot of the Sitecore on your gmail with subject “Prashant facing commerce installation issue”
LikeLike
Hi Prashant. by default its running Uninstall script , you have to edit the powershell script to run the installation
sc930_com_install.ps1 and comment the line 296 + Uncomment out the line 293 then save and run the Ps Script
LikeLike
Thanks @baljisitecore, it is working now.
Thanks, @Viet for your reply on email
LikeLike