This one is a summary of my own experience for Sitecore Commerce 9 Initial Release (aka Sitecore XC 9.0.0) installation on my machine. I’ve had quite much experience in Sitecore 9 installation so I decided to go only with:
- Installation Guide – On Premises (Thanks Sitecore team!)
However, that’s really another story because there were some issues which I could not solve quickly by myself. These ones are so helpful for me (thank you, guys):
- https://naveed-ahmad.com/2018/02/25/sitecore-experience-commerce-xc9-troubleshooting-your-installation/
- https://www.linkedin.com/pulse/installing-sitecore-xc-90-kautilya-prasad/
- https://medium.com/redhotminute-australia/sitecore-9-commerce-install-and-sql-2017-db06215487bf
I do hope that this blog post is helpful for your own journey as well.
Update 1 (24-Mar-2018): you can play with Sitecore Commerce 9 Update 1 as well
Update 2 (15-Jul-2018): you can play with Sitecore Commerce 9 Update 2 as well
Update 3 (10-Dec-2018): you can play with Sitecore Commerce 9 Update 3 as well
Setup Prerequisites
Please refer to the Sitecore Experience Commerce 9 Compatibility Table for the software and version prerequisites:
- Windows 10
- Sitecore Experience Platform 9.0 Update 1
- Sitecore Experience Accelerator 1.6 (Note: must log into https://dev.sitecore.net/ before downloading)
- Sitecore Powershell Extensions 4.7.2
- .NET Core SDK 2.0.0
- .NET Core Windows Server Hosting 2.0.0
- Packages for On Premises 2018.01-2.0.254 (Note: must log into https://dev.sitecore.net/ before downloading)
Step-by-step guide
- install the ones below if not yet 😀
- a fresh Sitecore 9.0 Update 1 instance , let’s say sc9com.local and sc9com.xconnect.local (xConnect site)
- .NET Core SDK 2.0.0
- .NET Core Windows Server Hosting 2.0.0
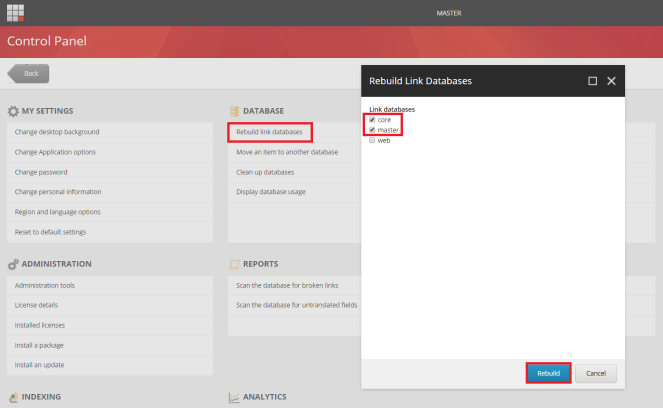
- rebuild the Link databases for the master and core databases if not yet:
- on the Sitecore Launchpad, click Control Panel, and in the Database section, click Rebuild Link Databases
- select the master and core databases and then click Rebuild
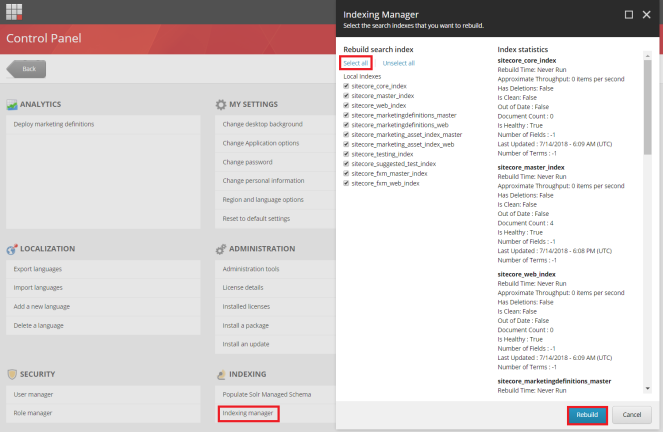
- rebuild the search indexes if not yet:
- on the Sitecore Launchpad, click Control Panel, and in the Indexing section, click Indexing manager
- in the Indexing Manager dialog box, click Select all, and then click Rebuild
- stop the xConnect site sc9com.xconnect.local
- create a new folder E:\sc9_com_install
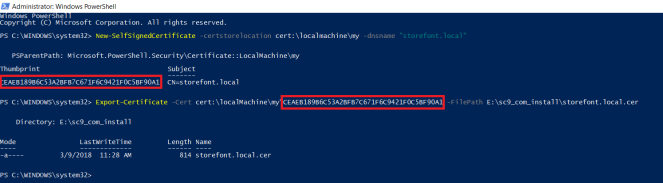
- create a certificate for the Sitecore Commerce Engine Connect to authenticate with the Sitecore XC Engine:
- launch PowerShell as an administrator
- create the certificate by running the following cmdlet:
- New-SelfSignedCertificate -certstorelocation cert:\localmachine\my -dnsname “storefront.local”
- export the certificate to a file by running the following cmdlet:
- Export-Certificate -Cert cert:\localMachine\my\<Thumbprint-of-cert> -FilePath E:\sc9_com_install\storefront.local.cer
- download MSBuild Microsoft Visual Studio Web targets (available from Nuget) then extract the Web targets package, copy the \tools\VSToolsPath\Web\Microsoft.Web.XmlTransform.dll file into E:\sc9_com_install
- download Sitecore Experience Accelerator 1.6 (Note: must log into https://dev.sitecore.net/ before downloading) and put it into E:\sc9_com_install
- download Sitecore Powershell Extensions 4.7.2 then put it into E:\sc9_com_install
- download and unzip Packages for On Premises 2018.01-2.0.254 (Note: must log into https://dev.sitecore.net/ before downloading)
- unzip E:\sc9_com_install\SIF.Sitecore.Commerce.1.0.1748.zip and then rename E:\sc9_com_install\SIF.Sitecore.Commerce.1.0.1748 to E:\sc9_com_install\SIF for a better practice
- unzip the E:\sc9_com_install\Sitecore.BizFX.1.0.572.zip
- unzip the E:\sc9_com_install\Sitecore.Commerce.Engine.SDK.2.0.1922.zip file then copy the E:\sc9_com_install\Sitecore.Commerce.Engine.SDK.2.0.1922\Sitecore.Commerce.Engine.DB.dacpac file into E:\sc9_com_install
- unzip E:\sc9_com_install\Sitecore.Commerce.Engine.2.0.1922.zip
- open E:\sc9_com_install\Sitecore.Commerce.Engine.2.0.1922\wwwroot\bootstrap\Global.json
- replace the Database‘s value to SitecoreCommerce9_Global at line 93 (the default value
SitecoreCommerce_Globalis NOT correct) 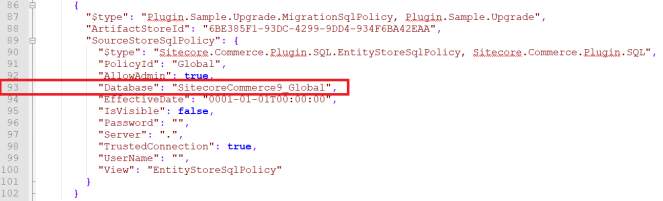
- zip the folder E:\sc9_com_install\Sitecore.Commerce.Engine.2.0.1922 as E:\sc9_com_install\Sitecore.Commerce.Engine.2.0.1922\Sitecore.Commerce.Engine.2.0.1922.zip file then overwrite E:\sc9_com_install\Sitecore.Commerce.Engine.2.0.1922.zip with it
- download sc9_com_install.ps1 and put it into E:\sc9_com_install\SIF then open it to correct 09 parameters below:
- $SiteName
- $ScInstallDirectory
- $SiteHostHeaderName
- $SqlServer
- $SqlDbPrefix
- $CommerceEngineCertificatePath
- $SolrUrl
- $SolrRoot
- $SolrService
- (optional): you can specify any local account (note: it will be created automatically if non-existent) to be set up for the various application pools that are created as part of the deployment at line 69-70 of sc9_com_install.ps1
- (optional): if you play with SQL Server 2017, you will have to download DeployCommerceDatabase.psm1 then overwrite E:\sc9_com_install\SIF\Modules\DeployCommerceDatabase\DeployCommerceDatabase.psm1
- (optional): if you have multiple instances of SQL Server on your machine, you will have to:
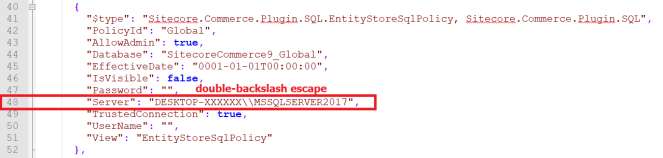
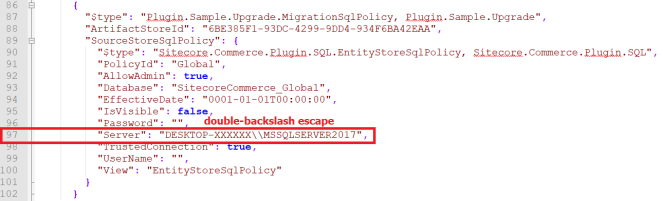
- unzip E:\sc9_com_install\Sitecore.Commerce.Engine.2.0.1922.zip
- open E:\sc9_com_install\Sitecore.Commerce.Engine.2.0.1922\wwwroot\bootstrap\Global.json
- replace the Server‘s value to your SQL Server instance at line 48 and line 97
- open E:\sc9_com_install\Sitecore.Commerce.Engine.2.0.1922\wwwroot\data\Environments\Plugin.SQL.PolicySet-1.0.0.json then replace the Server‘s value to your SQL Server instance at line 15
- open E:\sc9_com_install\Sitecore.Commerce.Engine.2.0.1922\wwwroot\data\Environments\PlugIn.Habitat.CommerceAuthoring-1.0.0.json then replace the Server‘s value to your SQL Server instance at line 102
- open E:\sc9_com_install\Sitecore.Commerce.Engine.2.0.1922\wwwroot\data\Environments\PlugIn.AdventureWorks.CommerceAuthoring-1.0.0.json then replace the Server‘s value to your SQL Server instance at line 102
- zip the folder E:\sc9_com_install\Sitecore.Commerce.Engine.2.0.1922 as E:\sc9_com_install\Sitecore.Commerce.Engine.2.0.1922\Sitecore.Commerce.Engine.2.0.1922.zip file then overwrite E:\sc9_com_install\Sitecore.Commerce.Engine.2.0.1922.zip with it
- (optional): again, if you have multiple instances of SQL Server on your machine, you will have to:
- unzip E:\sc9_com_install\Sitecore.IdentityServer.1.0.65.zip
- open E:\sc9_com_install\Sitecore.IdentityServer.1.0.65\wwwroot\appsettings.json, replace the Data Source‘s value to your SQL Server instance at line 4

- (optional): you may get timeout exceptions (some tasks’ execution timeout is only 12 minutes by default and the remote query timeout of SQL Server is only 10 minutes by default) so I suggest:
- download SitecoreUtilityTasks.psm1 then overwrite E:\sc9_com_install\SIF\Modules\SitecoreUtilityTasks\SitecoreUtilityTasks.psm1 in order to increase the execution timeout
- download PerformanceTweak.config then put it into \sc901com.local\App_Config\Environment in order to turn all Sitecore jobs off and disable xDB for a better installation (you know, it’s a super long operation :D)
- configure the remote query timeout option of SQL Server:
- using SQL Server Management Studio
- in Object Explorer, right-click a server and select Properties
- under Remote server connections, in the Remote query timeout box, type or select a value from 0 through 2,147,483,647 to set the maximum number seconds for SQL Server to wait before timing out
- consider to put $global:ProgressPreference = ‘silentlyContinue’ into the sc9_com_install.ps1 in order to speed up the operation
- launch PowerShell as an administrator

- hopefully there is nothing can stop the installation process now
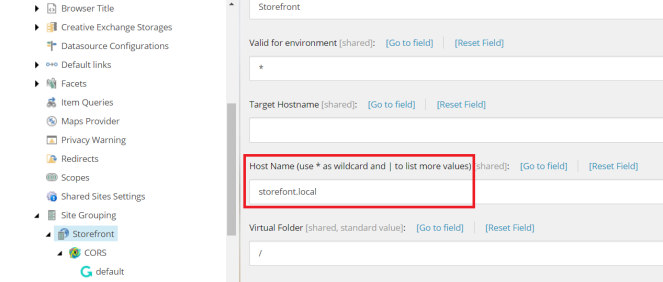
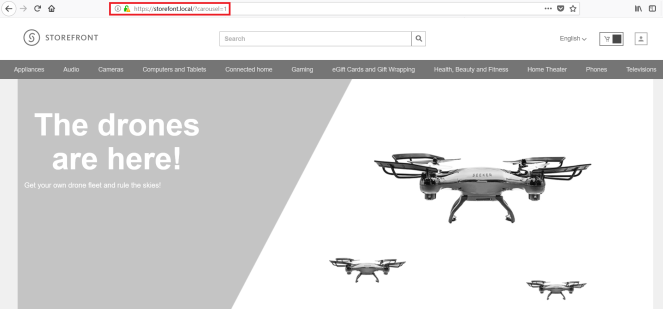
- open a browser then navigate to storefront.local/, you would see the default page of Sitecore webiste. That’s because we don’t use the default host name sxa.storefront.com so we need to correct it inside Sitecore
- log into sc9com.local/sitecore/
- access /sitecore/content/Sitecore/Storefront/Settings/Site Grouping/Storefront
- update Host Name to storefront.local then publish
- refresh storefront.local/, you would see something like this
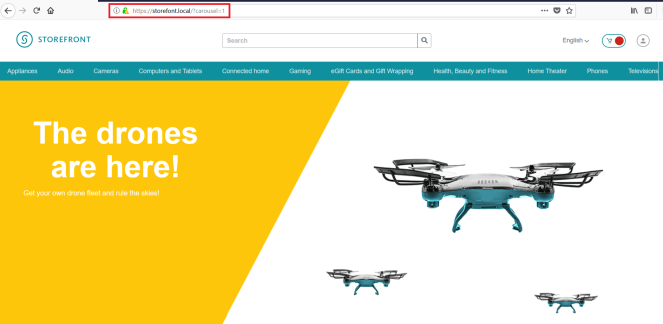
- I’m sure that you want to make it more fancy so access /sitecore/content/Sitecore/Storefront/Presentation/Page Designs
- update Theme to Storefont Branded then publish

- refresh storefront.local/, you would see something like this
- DO NOT forget to perform Post-Installation Steps
- remove \sc901com.local\App_Config\Environment\PerformanceTweak.config if existent
- follow Chapter 4 Post-Installation Steps (Page 19 – 23) in Sitecore Commerce 9 Installation Guide

The recommendations
- we can remove the tasks completed from E:\sc9_com_install\SIF\Configuration\Commerce\Master_SingleServer.json and re-do Step 21 if there is something wrong (especially for Note: some known issues below) so that we are able to save a lot of time 😀
- if there is something wrong during installation process, we always have a chance to correct it via json files (note: need to do IIS reset after updating):
- C:\inetpub\wwwroot\SitecoreIdentityServer\wwwroot\appsettings.json
- C:\inetpub\wwwroot\CommerceShops_Sc9\wwwroot\bootstrap\Global.json
- C:\inetpub\wwwroot\CommerceOps_Sc9\wwwroot\bootstrap\Global.json
- C:\inetpub\wwwroot\CommerceMinions_Sc9\wwwroot\bootstrap\Global.json
- C:\inetpub\wwwroot\CommerceAuthoring_Sc9\wwwroot\bootstrap\Global.json
- C:\inetpub\wwwroot\CommerceShops_Sc9\wwwroot\data\Environments\Plugin.SQL.PolicySet-1.0.0.json
- C:\inetpub\wwwroot\CommerceShops_Sc9\wwwroot\data\Environments\PlugIn.Habitat.CommerceAuthoring-1.0.0.json
- C:\inetpub\wwwroot\CommerceShops_Sc9\wwwroot\data\Environments\PlugIn.AdventureWorks.CommerceAuthoring-1.0.0.json
How to uninstall it?
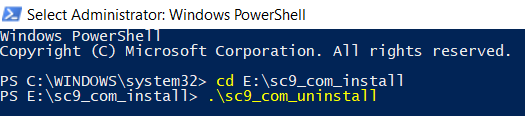
- download sc9_com_uninstall.ps1 (the original one is here – thanks Naveed Admad) and put it into E:\sc9_com_install then open it to correct 12 parameters below:
- $Prefix
- $CommerceOpsSiteName
- $CommerceShopsSiteName
- $CommerceAuthoringSiteName
- $CommerceMinionsSiteName
- $SitecoreBizFxSiteName
- $SitecoreIdentityServerSiteName
- $SolrService
- $PathToSolr
- $SqlServer
- $SqlAccount
- $SqlPassword
- launch PowerShell as an administrator
- hopefully, it runs well and cleans everything up
Note: some known issues
- The service cannot accept control messages at this time
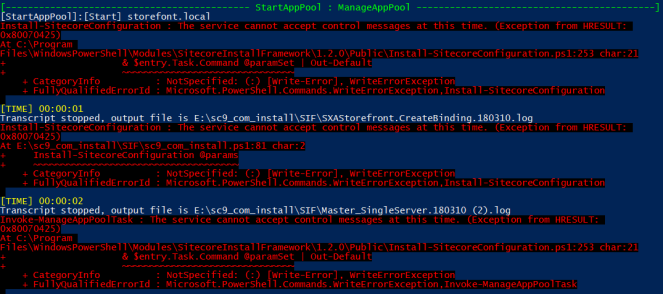
- access IIS, start sc9com.local site and sc9com.local application pool manually (note: you may need to do it several times) if they’re in STOP status, somehow IIS cannot restart those ones after stopping them
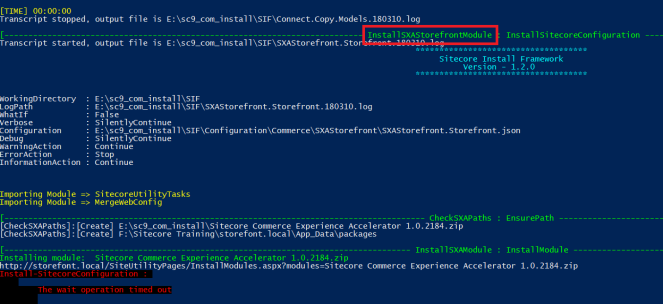
- The wait operation timed out: [SqlException (0x80131904): Connection Timeout Expired. The timeout period elapsed during the post-login phase. The connection could have timed out while waiting for server to complete the login process and
respond; Or it could have timed out while attempting to create multiple active connections.
- open E:\sc9_com_install\SIF\Configuration\Commerce\Master_SingleServer.json to remove the tasks completed
- for instance, I would remove all the completed tasks before InstallSXAFrameworkModule then re-do Step 21 again
- Request timed out: Exception Details: System.Web.HttpException: Request timed out.
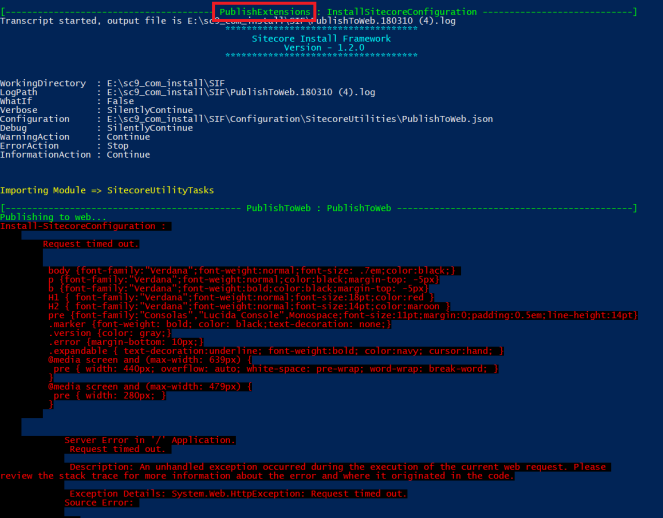
- my suggestions:
- open E:\sc9_com_install\SIF\Configuration\Commerce\Master_SingleServer.json to remove the tasks completed
- for instance, I would remove all the completed tasks before PublishExtensions then re-do Step 21 again
- consider to perform Step 20 as well if solution #1 does not work as expected then re-do Step 21 again
- open E:\sc9_com_install\SIF\Configuration\Commerce\Master_SingleServer.json to remove the tasks completed
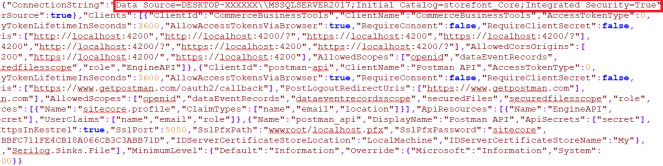
- Get Token From Sitecore.IdentityServer: The remote server returned an error: (500) Internal Server Error
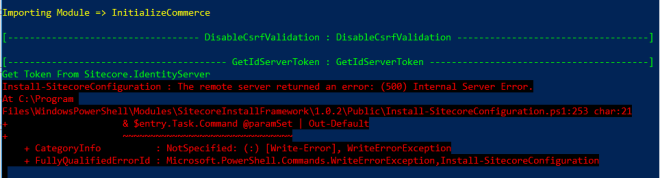
- open C:\inetpub\wwwroot\SitecoreIdentityServer\wwwroot\appsettings.json then ensure your connection string is correct (especially for the case you’re using your own SQL Server instance)
- Something went wrong restarting SQL server again: Cannot validate argument on parameter ‘InputObject’. The argument is null or empty. Provide an argument that is not null or empty, and then try the command again.

- somehow SQL Server window service cannot restart after stopping, ensure SQL Server window service is running
Got issues?
Please send your issues (with screenshots if possible) to viet.hoang.sitecore@gmail.com so that I have a chance to understand your problem and be able to suggest the solution.
Happy Sitecore Installation!

Hi Viet Hoang,
First of all thanks for posting the article. This is helpful.
Well I performed all the steps and i did not get any error while running the powershell script but after performing Step no 22, I am getting blank page. Then checked the presentation details of /sitecore/content/Sitecore/Storefront/Home and found that there is nothing there. Also the screenshot you added are showing lot more content but in my case it is only few folders and items.
Is there anything I missed installing.
Thanks,
Ashish Kapoor
LikeLiked by 2 people
Hi Ashish,
Thanks for practising with this one. It seems that you did not perform Step 2 & 3.
Regards
LikeLiked by 1 person
Hi Viet Hoang,
I completed step 2 & 3 both before starting setting up commerce.
Thanks,
Ashish Kapoor
LikeLike
Hi Ashish,
Can you open “Schema Populate” dialog and then ensure all “Local Indexes” checkboxes are available on that dialog at this time?
Regards
LikeLike
I also tried setting up a a site using below help document but again there are no renderings on the home page. I can now see at least features as per your screenshot.
https://doc.sitecore.net/sxa_storefront/build_a_storefront_with_sxa_storefront/build_a_storefront_with_sxa_storefront/set_up_the_sxa_storefront_template_site
LikeLike
Sorry, it’s out of my knowledge at this time so I think you need an extra help. I highly recommend you to:
– join Sitecore Slack: https://sitecorechat.slack.com/ (you can register here https://docs.google.com/forms/d/e/1FAIpQLScsJX9PC3m8u-labRn_BNnByR0aiAxPYowN-doed6_t45aPhg/viewform)
– add your query to Sitecore StackExchange https://sitecore.stackexchange.com/
There are many experienced Sitecore devs and Sitecore experts around the world are willing to give a hand in the ones above.
LikeLike
Hi Viet Hoang,
Just want to say that your blogs are. just awesome
LikeLiked by 1 person
Thanks, I’m so glad that my blog posts are helpful for everyone 🙂
LikeLike