
This post is used for my workshop at the company. However, it might be an initiative of your own approach for the automating Sitecore deployments with TeamCity. (Note: the summary is here)
- Applying build and integration of Sitecore Helix
- Using XML Transforms to support multiple build configurations
- Using Unicorn – a Sitecore utility designed to simplify deployment of Sitecore items across environments automatically
- Dedicating to my simple framework version 1.5
Setup Prerequisites
How to set it up
- use SIM if possible to setup 03 new Sitecore 8.2 Update 4 instances:
- 01 CA whose site name should be viethoang.ca.local
- 01 CD whose site name should be viethoang.cd1.local
- 01 CD whose site name should be viethoang.cd2.local
- copy-paste \App_Config\ConnectionStrings.config of CA to overwrite the one of CD1 & CD2 to make sure 03 Sitecore instances using the same databases
- install Node.js
- install TeamCity 812 then log into TeamCity
- create a new TeamCity project Vh Local
- Administration -> Projects -> Create project
- create a new TeamCity build configuration CA – CD1 – CD2
- Administration -> Projects -> Vh Local -> Create build configuration
- create a new Version Control Settings Vh_Release
- Administration -> Projects -> Vh Local -> CA – CD1 – CD2
- left navigation: select Version Control Settings -> Attach VCS root
- fulfill the fields below:
- Type of VCS: Git
- VCS root name: Vh_Release
- Fetch URL: https://gitlab.com/viet.hoang/my-simple-framework.git
- Default branch: refs/heads/Release-1.5.3
- Authentication method: Anonymous
- click Test connection to make sure Connection successful!
- click Save
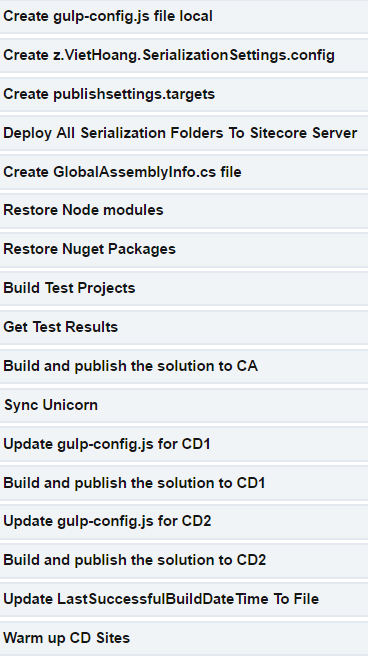
- create Build Steps
- Administration -> Projects -> Vh Local -> CA – CD1 – CD2
- left navigation: select Build Steps -> Add build step
- add build step Create gulp-config.js file local
- fulfill the fields below:
- Runner type: PowerShell
- Step name: Create gulp-config.js file local
- Script: Source code
- Script source: copy/paste this one
- Script execution mode: Execute .ps1 from external file
- click Save
- fulfill the fields below:
- repeat #8 to add build step Create z.VietHoang.SerializationSettings.config
- fulfill the fields below:
- Runner type: PowerShell
- Step name: Create z.VietHoang.SerializationSettings.config
- Script: Source code
- Script source: copy/paste this one
- Script execution mode: Execute .ps1 from external file
- click Save
- fulfill the fields below:
- repeat #8 to add build step Create publishsettings.targets
- fulfill the fields below:
- Runner type: PowerShell
- Step name: Create publishsettings.targets
- Script: Source code
- Script source: copy/paste this one
- Script execution mode: Execute .ps1 from external file
- click Save
- fulfill the fields below:
- repeat #8 to add build step Deploy All Serialization Folders To Sitecore Server
- fulfill the fields below:
- Runner type: PowerShell
- Step name: Deploy All Serialization Folders To Sitecore Server
- Script: Source code
- Script source: copy/paste this one
- Script execution mode: Execute .ps1 from external file
- click Save
- fulfill the fields below:
- repeat #8 to add build step Create GlobalAssemblyInfo.cs file
- fulfill the fields below:
- Runner type: PowerShell
- Step name: Create GlobalAssemblyInfo.cs file
- Script: Source code
- Script source: copy/paste this one
- Script execution mode: Execute .ps1 from external file
- click Save
- fulfill the fields below:
- install Gulp build runner to run gulp scripts
- Upload Gulp build runner to TeamCity
- Administration -> Plugins List -> Upload plugin zip
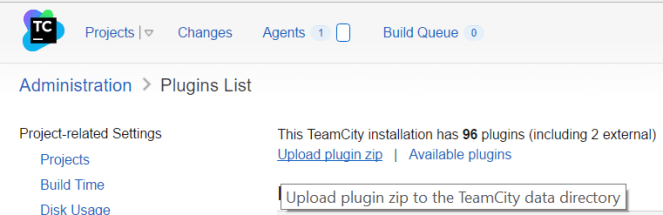
- note: if the link above does not work, select latest successful build here https://teamcity.jetbrains.com/viewType.html?buildTypeId=bt434
- make sure downloaded
.zipfile is not corrupted 
- put the downloaded plugin
.zipfile into<TeamCity Data Directory>/pluginsfolder (normally it’s C:\ProgramData\JetBrains\TeamCity\plugins)
- make sure downloaded
- restart TeamCity Server via Window Services

- Upload Gulp build runner to TeamCity
- repeat #8 to add build step Restore Node modules
- fulfill the fields below:
- Runner type: Node.js NPM
- Step name: Restore Node modules
- npm commands: install
- click Save
- fulfill the fields below:
- repeat #8 to add build step Restore Nuget Packages
- fulfill the fields below:
- Runner type: Nuget Installer
- Step name: Restore Nuget Packages
- Nuget.exe: 4.1.0 (or later)
- If there are no any Nuget.exe, please install it:
- Administration -> Tools -> NuGet.exe -> Install Version…
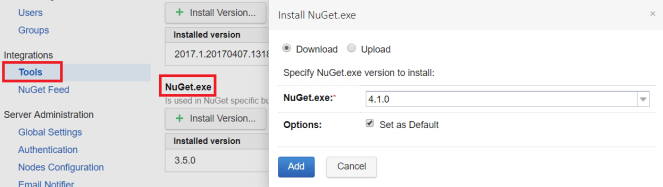
- If there are no any Nuget.exe, please install it:
- Path To Solution File: %vh.solutionFile%
- Restore Mode: Restore (requires NuGet 2.7+)
- click Save
- fulfill the fields below:
- repeat #8 to add build step Build Test Projects
- fulfill the fields below:
- Runner type: Gulp
- Step name: Build Test Projects
- Gulp File: gulpfileForTest.js
- click Save
- fulfill the fields below:
- repeat #8 to add build step Get Test Results
- fulfill the fields below:
- Runner type: Visual Studio Tests
- Step name: Get Test Results
- Test engine type: MSTest
- Test engine version: MSTest 2015
- Test file names: **/bin/%vh.buildConfiguration%/*.Tests.dll
- click Save
- fulfill the fields below:
- repeat #8 to add build step Build and publish the solution to CA
- fulfill the fields below:
- Runner type: Gulp
- Step name: Build and publish the solution to CA
- Gulp File: gulpfile.js
- click Save
- fulfill the fields below:
- repeat #8 to add build step Sync Unicorn
- fulfill the fields below:
- Runner type: Gulp
- Step name: Sync Unicorn
- Gulp File: gulpFileForUnicorn.js
- click Save
- fulfill the fields below:
- repeat #8 to add build step Update gulp-config.js for CD1
- fulfill the fields below:
- Runner type: PowerShell
- Step name: Update gulp-config.js for CD1
- Script: Source code
- Script source: copy/paste this one
- Script execution mode: Execute .ps1 from external file
- click Save
- fulfill the fields below:
- repeat #8 to add build step Build and publish the solution to CD1
- fulfill the fields below:
- Runner type: Gulp
- Step name: Build and publish the solution to CD1
- Gulp File: gulpfile.js
- click Save
- fulfill the fields below:
- repeat #8 to add build step Update gulp-config.js for CD2
- fulfill the fields below:
- Runner type: PowerShell
- Step name: Update gulp-config.js for CD2
- Script: Source code
- Script source: copy/paste this one
- Script execution mode: Execute .ps1 from external file
- click Save
- fulfill the fields below:
- repeat #8 to add build step Build and publish the solution to CD2
- fulfill the fields below:
- Runner type: Gulp
- Step name: Build and publish the solution to CD2
- Gulp File: gulpfile.js
- click Save
- fulfill the fields below:
- repeat #8 to add build step Update LastSuccessfulBuildDateTime To File
- fulfill the fields below:
- Runner type: PowerShell
- Step name: Update LastSuccessfulBuildDateTime To File
- Script: Source code
- Script source: copy/paste this one
- Script execution mode: Execute .ps1 from external file
- click Save
- fulfill the fields below:
- repeat #8 to add build step Warm up CD Sites
- fulfill the fields below:
- Runner type: PowerShell
- Step name: Warm up CD Sites
- Script: Source code
- Script source: copy/paste this one
- Script execution mode: Execute .ps1 from external file
- click Save
- fulfill the fields below:
- finally we’ve just done for all the build steps
What’s next?
We will fulfill the value of all the configuration parameters so that the automating deployment will be able to run successfully in Part 2.

One thought on “Workshop – Automating Sitecore deployments with TeamCity at your machine (Part 1)”