
This post is a summary of my workshop at the company. However, it might be an initiative of your own approach for automated Sitecore XP 9.3 Initial Release deployment with TeamCity and automated code review with SonarQube
- Applying build and integration of Sitecore Helix
- Using XML Transforms to support multiple build configurations
- Using Unicorn – a Sitecore utility designed to simplify deployment of Sitecore items across environments automatically
- Dedicating to my simple development framework version 2.5
- Using TeamCity: powerful Continuous Integration out of the box
- Using SonarQube: an open-source tool that is used as a continuous inspection of code quality and to perform static code analysis to detect bugs, code smells, vulnerabilities, it can report duplicated code, coding standards, unit tests, code coverage, code complexity, comments
Setup Prerequisites
- Sitecore XP 9.3 Initial Release
- TeamCity 2019.2
- TeamCity_VietHoangSitecore.zip: my TeamCity project is used for the workshop (note: for your information)
- SonarQube 8.1 Community Edition
How to set up the automated deployment
- setup a new Sitecore XP 9.3 Initial Release instance whose host name should be viethoang.local
- bind the second host name hoavi.local
- bind the third host name demo.local
- install TeamCity 2019.2
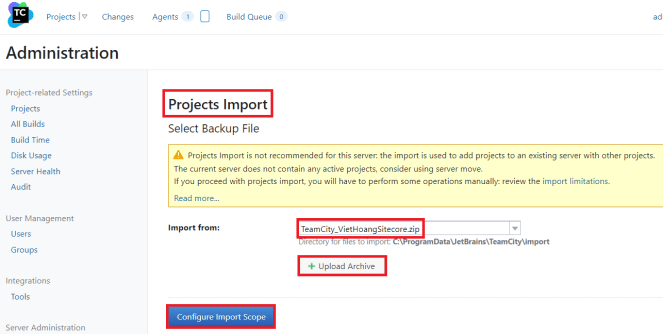
- import TeamCity_VietHoangSitecore.zip to TeamCity (note: for your information)
- Administration -> Projects Import -> Upload Archive then click Configure Import Scope button
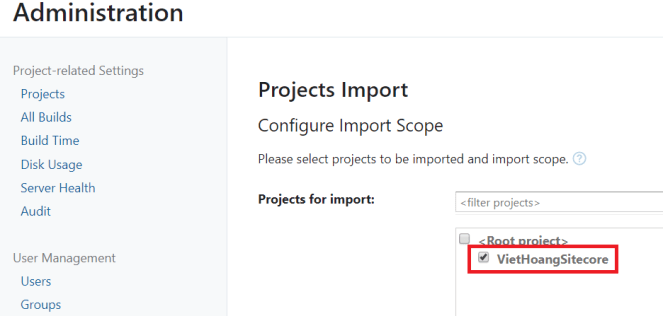
- check VietHoangSitecore checkbox and then click Start Import button
- go to Administration -> -> VietHoangSitecore -> Release -> Edit Configuration
- click on Parameters and then correct 03 Configuration Parameters below as they might be different between my machine and your machine
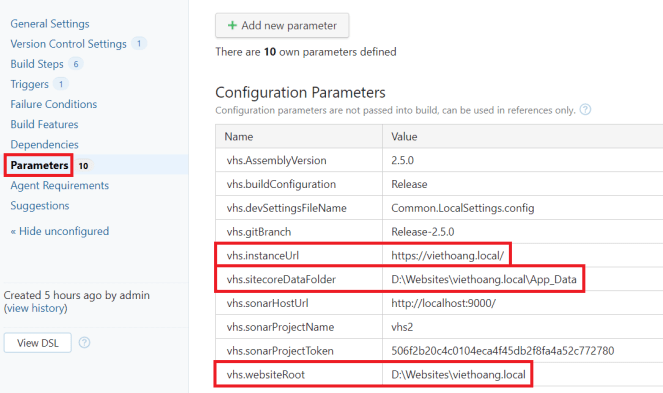
- vhs.instanceUrl: your Sitecore instance URL
- vhs.sitecoreDataFolder: the full path of data folder of your Sitecore instance
- vhs.websiteRoot: the full path of website folder of your Sitecore instance
- run build Release
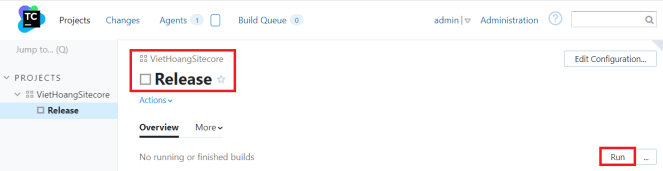
- hopefully you will have no any issues and when the build is done, you would see something like this:
- verify the automated Sitecore deployment on your machine:
- open a browser, navigate to http://hoavi.local
- open a browser, navigate to http://demo.local
- hopefully, you would see something like this:

How to set up the automated code review
Inspired by this article Ensure and monitor your source code quality with SonarQube and Analyze your Sitecore source code of Arvind Gehlot
- download SonarQube 8.1 Community edition
- extract .zip file (Ex: C:\sonarqube) and learn about the prerequisites
- highly recommend doing following things so we can play around with command-line much easier
- install chocolatey
- open Windows PowerShell (run as administrator) and then execute Set-ExecutionPolicy -Scope CurrentUser Unrestricted

- install OpenJdk version 11 or later: open Windows PowerShell (run as administrator) and then execute choco install openjdk
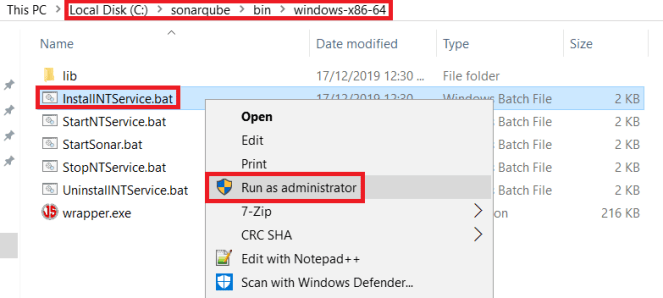
- run SonarQube as a windows service by running as administrator C:\sonarqube\bin\windows-x86-64\InstallNTService.bat
- you may cannot start SonarQube windows service and see the error message SonarQube requires Java 11 to run in C:\sonarqube\logs\sonar.log
- my suggestion is to edit C:\sonarqube\conf\wrapper.conf by specifying absolute path of java folder like this

- open a browser, navigate to http://localhost:9000 and then log into by using default account admin (its password is admin)
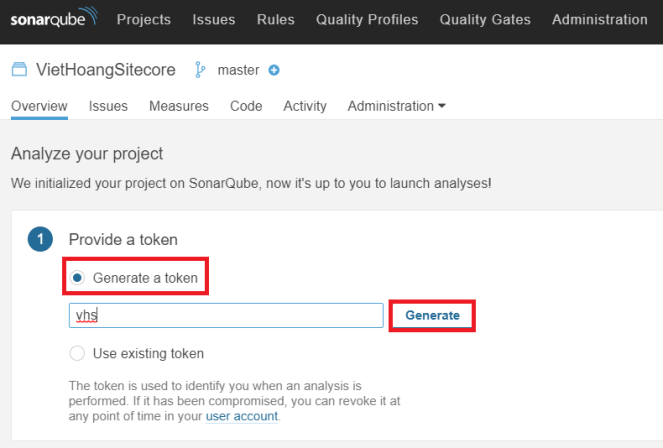
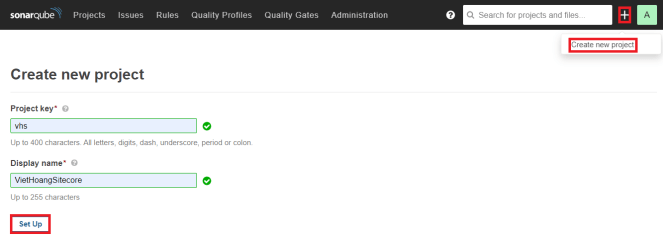
- to analyze the solution, we need to create a new project in SonarQube first
- generate an unique token that identifies the project
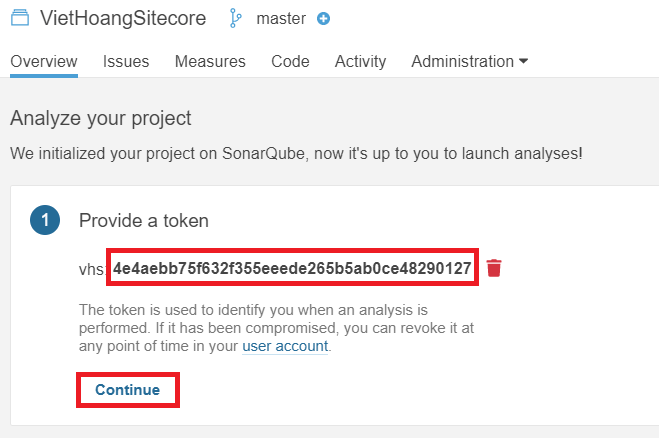
- note the token and then click Continue button
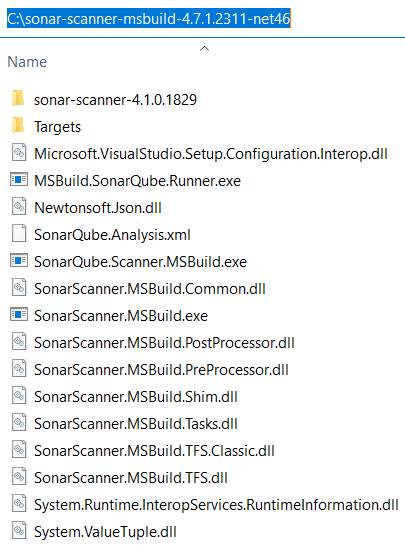
- select the language, it should be C#. Also, click Download button to download the scanner for MSBuild and then add the executable’s directory to the
%PATH%environment variable (Ex: C:\sonar-scanner-msbuild-4.7.1.2311-net46)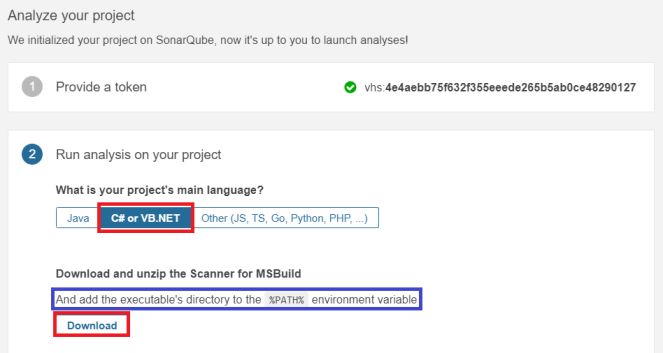
- extract .zip file
- add bin folder of MSBuild to PATH environment variable
- install NodeJs by executing choco install nodejs via Windows PowerShell (run as admin)
- finally, we should see something like the following ones in %PATH% environment variable
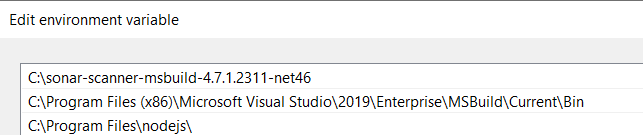
- Note: you may need to restart TeamCity’s Build Agent windows service after editing %PATH% environment variable as well
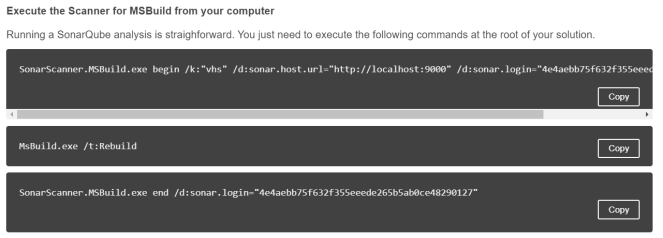
- start analyzing the code
- normally, we start analyzing the code by running 03 following command executions one by one via command prompt
- fortunately, we have the automated deployment in place so just enable Execute the Sonar Scanner for MSBuild build step in TeamCity
-
configure SonarQube’s project name and token in TeamCity
- ensure running the build successfully via TeamCity and then log into SonarQube UI to view the generated report, we would see something like this


Got issues?
Please send your issues (with screenshots if possible) to viet.hoang.sitecore@gmail.com so that I have a chance to understand your problem and be able to suggest the solution.
Happy Sitecore Playing!

2 thoughts on “Sitecore 9 – Automated deployment with TeamCity and automated code review with SonarQube”