This one is a summary of my own experience for Sitecore Experience Commerce 9 Update 1 (aka Sitecore XC 9.0.1) installation on my machine. I’ve had experience in Sitecore XC9 installation so I decided to go only with:
- Installation Guide – On Premises (Thanks Sitecore team!)
I do hope that this blog post is helpful for your own journey as well.
Setup Prerequisites
Please refer to the Sitecore Experience Commerce 9 Compatibility Table for the software and version prerequisites:
- Windows 10
- Sitecore Experience Platform 9.0 Update 1
- Sitecore Experience Accelerator 1.6 (Note: must log into https://dev.sitecore.net/ before downloading)
- Sitecore Powershell Extensions 4.7.2
- .NET Core SDK 2.0.0
- .NET Core Windows Server Hosting 2.0.0
- Packages for On Premises 2018.03-2.1.55 (Note: must log into https://dev.sitecore.net/ before downloading)
Step-by-step guide
- install the ones below if not yet 😀
- a fresh Sitecore 9.0 Update 1 instance , let’s say sc9com.local and sc9com.xconnect.local (xConnect site)
- .NET Core SDK 2.0.0
- .NET Core Windows Server Hosting 2.0.0
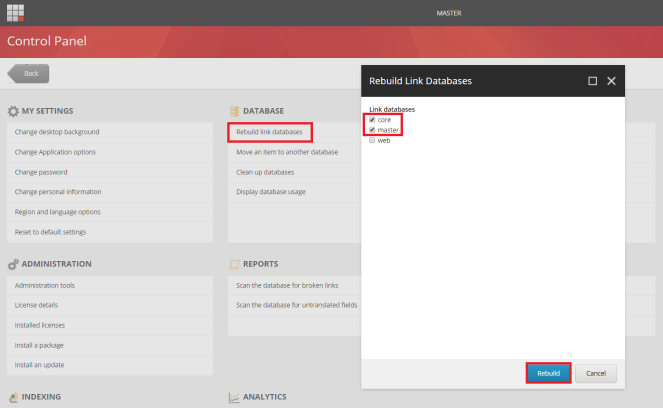
- rebuild the Link databases for the master and core databases if not yet:
- on the Sitecore Launchpad, click Control Panel, and in the Database section, click Rebuild Link Databases
- select the master and core databases and then click Rebuild
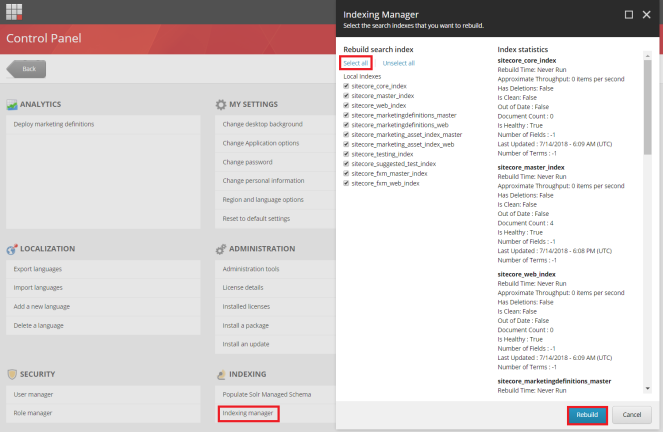
- rebuild the search indexes if not yet:
- on the Sitecore Launchpad, click Control Panel, and in the Indexing section, click Indexing manager
- in the Indexing Manager dialog box, click Select all, and then click Rebuild
- stop the xConnect site sc9com.xconnect.local
- create a new folder E:\sc9_com_install
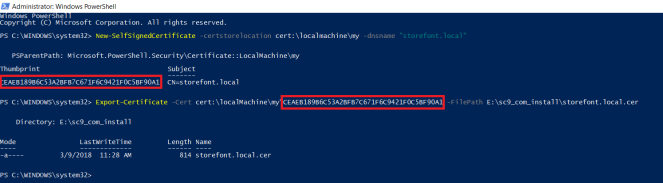
- create a certificate for the Sitecore Commerce Engine Connect to authenticate with the Sitecore XC Engine:
- launch PowerShell as an administrator
- create the certificate by running the following cmdlet:
- New-SelfSignedCertificate -certstorelocation cert:\localmachine\my -dnsname “storefront.local”
- export the certificate to a file by running the following cmdlet:
- Export-Certificate -Cert cert:\localMachine\my\<Thumbprint-of-cert> -FilePath E:\sc9_com_install\storefront.local.cer
- download MSBuild Microsoft Visual Studio Web targets (available from Nuget) then extract the Web targets package, copy the \tools\VSToolsPath\Web\Microsoft.Web.XmlTransform.dll file into E:\sc9_com_install
- download Sitecore Experience Accelerator 1.6 (Note: must log into https://dev.sitecore.net/ before downloading) and put it into E:\sc9_com_install
- download Sitecore Powershell Extensions 4.7.2 then put it into E:\sc9_com_install
- download and unzip Packages for On Premises 2018.03-2.1.55 (Note: must log into https://dev.sitecore.net/ before downloading)
- unzip E:\sc9_com_install\SIF.Sitecore.Commerce.1.1.4.zip and then rename E:\sc9_com_install\SIF.Sitecore.Commerce.1.1.4 to E:\sc9_com_install\SIF for a better practice
- unzip the E:\sc9_com_install\Sitecore.BizFX.1.1.9.zip
- unzip the E:\sc9_com_install\Sitecore.Commerce.Engine.SDK.2.1.10.zip file then copy the E:\sc9_com_install\Sitecore.Commerce.Engine.SDK.2.1.10\Sitecore.Commerce.Engine.DB.dacpac file into E:\sc9_com_install
- unzip E:\sc9_com_install\Sitecore.Commerce.Engine.2.1.55.zip
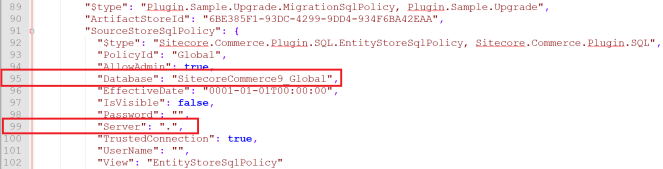
- open E:\sc9_com_install\Sitecore.Commerce.Engine.2.1.55\wwwroot\bootstrap\Global.json
- replace the Database‘s value to “SitecoreCommerce9_Global” at line 95 (the default value
SitecoreCommerce_Globalis NOT correct) - ensure the Server‘s value is “.” at line 99 (it’s empty by default)
- zip the folder E:\sc9_com_install\Sitecore.Commerce.Engine.2.1.55 as E:\sc9_com_install\Sitecore.Commerce.Engine.2.1.55\Sitecore.Commerce.Engine.2.1.55.zip file then overwrite E:\sc9_com_install\Sitecore.Commerce.Engine.2.1.55.zip with it
- download sc9_com_install.ps1 and put it into E:\sc9_com_install\SIF then open it to correct 09 parameters below:
- $SitePrefix
- $ScInstallDirectory
- $SiteHostHeaderName
- $SqlServer
- $SqlDbPrefix
- $CommerceEngineCertificatePath
- $SolrUrl
- $SolrRoot
- $SolrService
- (optional): you can specify any local account (note: it will be created automatically if non-existent) to be set up for the various application pools that are created as part of the deployment at line 70-71 of sc9_com_install.ps1
- (optional): if you play with SQL Server 2017, you will have to download DeployCommerceDatabase.psm1 then overwrite E:\sc9_com_install\SIF\Modules\DeployCommerceDatabase\DeployCommerceDatabase.psm1
- (optional): you may get timeout exceptions (some tasks’ execution timeout is only 12 minutes by default and the remote query timeout of SQL Server is only 10 minutes by default) so I suggest:
- download SitecoreUtilityTasks.psm1 then overwrite E:\sc9_com_install\SIF\Modules\SitecoreUtilityTasks\SitecoreUtilityTasks.psm1 in order to increase the execution timeout
- download PerformanceTweak.config then put it into \sc901com.local\App_Config\Environment in order to turn all Sitecore jobs off and disable xDB for a better installation (you know, it’s a super long operation :D)
- configure the remote query timeout option of SQL Server:
- using SQL Server Management Studio
- in Object Explorer, right-click a server and select Properties
- under Remote server connections, in the Remote query timeout box, type or select a value from 0 through 2,147,483,647 to set the maximum number seconds for SQL Server to wait before timing out
- consider to put $global:ProgressPreference = ‘silentlyContinue’ into the sc9_com_install.ps1 in order to speed up the operation
- launch PowerShell as an administrator

- hopefully there is nothing can stop the installation process now
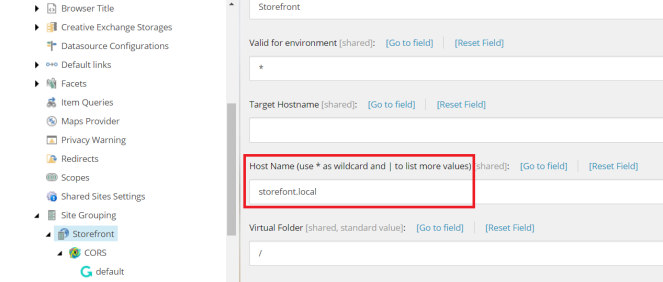
- open a browser then navigate to storefront.local/, you would see the default page of Sitecore webiste. That’s because we don’t use the default host name sxa.storefront.com so we need to correct it inside Sitecore
- log into sc9com.local/sitecore/
- access /sitecore/content/Sitecore/Storefront/Settings/Site Grouping/Storefront
- update Host Name to storefront.local then publish
- refresh storefront.local/, you would see something like this

- I’m sure that you want to make it more fancy so access /sitecore/content/Sitecore/Storefront/Presentation/Page Designs
- update Theme to Storefont Branded then publish

- refresh storefront.local/, you would see something like this

- DO NOT forget to perform Post-Installation Steps
- remove \sc9com.local\App_Config\Environment\PerformanceTweak.config if existent
- follow Chapter 4 Post-Installation Steps (Page 19 – 23) in Sitecore Commerce 9 Installation Guide

The recommendations
- we can remove the tasks completed from E:\sc9_com_install\SIF\Configuration\Commerce\Master_SingleServer.json and re-do Step 19 if there is something wrong (especially for Note: some known issues below) so that we are able to save a lot of time 😀
- if there is something wrong during installation process, we always have a chance to correct it via json files (note: need to do IIS reset after updating):
- C:\inetpub\wwwroot\SitecoreIdentityServer\wwwroot\appsettings.json
- C:\inetpub\wwwroot\CommerceShops_Sc9\wwwroot\bootstrap\Global.json
- C:\inetpub\wwwroot\CommerceOps_Sc9\wwwroot\bootstrap\Global.json
- C:\inetpub\wwwroot\CommerceMinions_Sc9\wwwroot\bootstrap\Global.json
- C:\inetpub\wwwroot\CommerceAuthoring_Sc9\wwwroot\bootstrap\Global.json
- C:\inetpub\wwwroot\CommerceShops_Sc9\wwwroot\data\Environments\Plugin.SQL.PolicySet-1.0.0.json
- C:\inetpub\wwwroot\CommerceShops_Sc9\wwwroot\data\Environments\PlugIn.Habitat.CommerceAuthoring-1.0.0.json
- C:\inetpub\wwwroot\CommerceShops_Sc9\wwwroot\data\Environments\PlugIn.AdventureWorks.CommerceAuthoring-1.0.0.json
How to uninstall it?
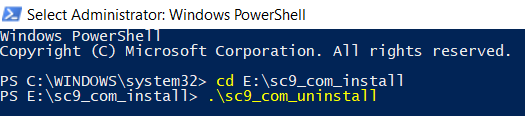
- download sc9_com_uninstall.ps1 (the original one is here – thanks Naveed Admad) and put it into E:\sc9_com_install then open it to correct 12 parameters below:
- $Prefix
- $CommerceOpsSiteName
- $CommerceShopsSiteName
- $CommerceAuthoringSiteName
- $CommerceMinionsSiteName
- $SitecoreBizFxSiteName
- $SitecoreIdentityServerSiteName
- $SolrService
- $PathToSolr
- $SqlServer
- $SqlAccount
- $SqlPassword
- launch PowerShell as an administrator
- hopefully, it runs well and cleans everything up
Note: some known issues
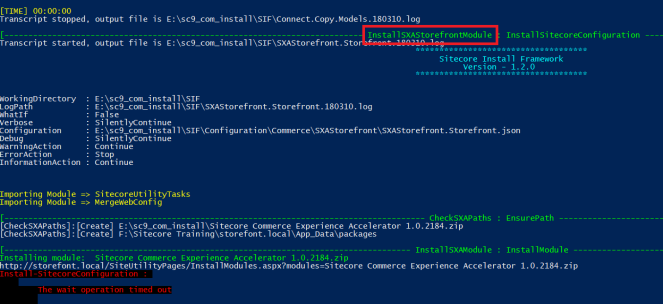
- The service cannot accept control messages at this time
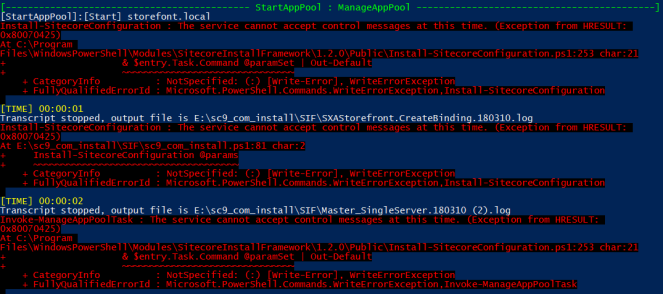
- access IIS, start sc9com.local site and sc9com.local application pool manually (note: you may need to do it several times) if they’re in STOP status, somehow IIS cannot restart those ones after stopping them
- The wait operation timed out: [SqlException (0x80131904): Connection Timeout Expired. The timeout period elapsed during the post-login phase. The connection could have timed out while waiting for server to complete the login process and
respond; Or it could have timed out while attempting to create multiple active connections.
- open E:\sc9_com_install\SIF\Configuration\Commerce\Master_SingleServer.json to remove the tasks completed
- for instance, I would remove all the completed tasks before InstallSXAFrameworkModule then re-do Step 19 again
- Request timed out: Exception Details: System.Web.HttpException: Request timed out.
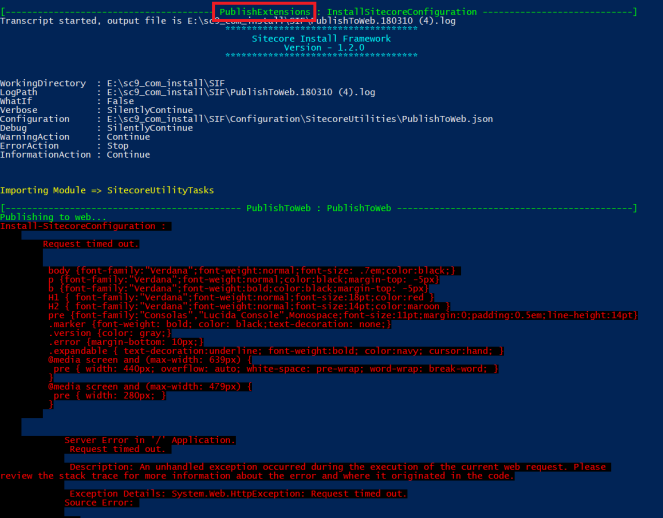
- my suggestions:
- open E:\sc9_com_install\SIF\Configuration\Commerce\Master_SingleServer.json to remove the tasks completed
- for instance, I would remove all the completed tasks before PublishExtensions then re-do Step 19 again
- consider to perform Step 18 as well if solution #1 does not work as expected then re-do Step 19 again
- open E:\sc9_com_install\SIF\Configuration\Commerce\Master_SingleServer.json to remove the tasks completed
- Something went wrong restarting SQL server again: Cannot validate argument on parameter ‘InputObject’. The argument is null or empty. Provide an argument that is not null or empty, and then try the command again.

- somehow SQL Server window service cannot restart after stopping, ensure SQL Server window service is running
- Install-SitecoreConfiguration : Cannot find path ‘C:\inetpub\wwwroot\CommerceOps_Sc9\wwwroot\config.json’ because it does not exist.
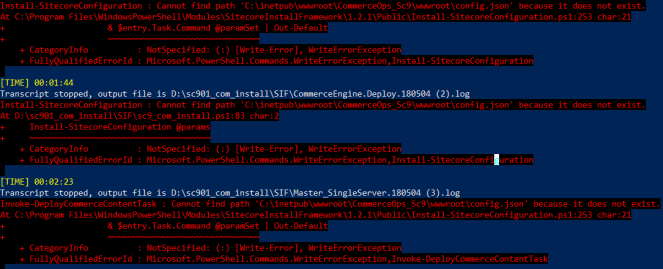
- in Step 14, ensure to create Sitecore.Commerce.Engine.2.1.55.zip correctly (especially directory structure)
- Get Token From Sitecore.IdentityServer: HTTP Error 503. The service is unavailable
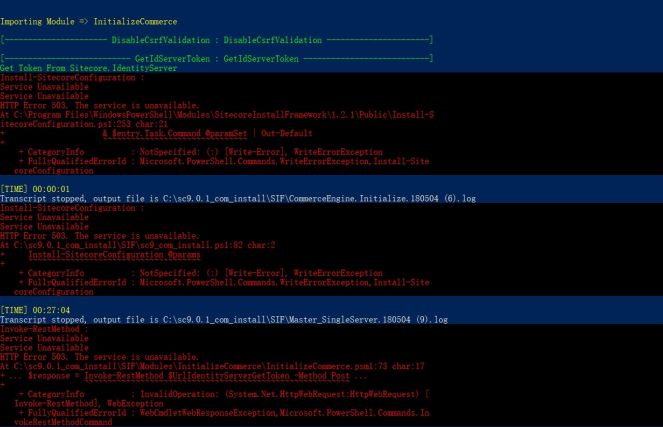
- my suggestions:
- ensure to install .Net Core stuffs
- correct connection string in “C:\inetpub\wwwroot\SitecoreIdentityServer\wwwroot\appsettings.json” and then do IIS reset
- correct the application pool of SitecoreIdentityServer site in IIS
Got issues?
Please send your issues (with screenshots if possible) to viet.hoang.sitecore@gmail.com so that I have a chance to understand your problem and be able to suggest the solution.
Happy Sitecore Installation!

I am always getting Invoke-DeployCommerceContentTask : Cannot find path ‘C:\inetpub\wwwroot\CommerceOps_Sc9\wwwroot\config.json’ because it does not exist. Error first it delete the folder and when trying to unzip the Sitecore.Commerce.Engine.2.1.55.zip it shows this error, I have given full permission to C:\inetpub\wwwroot\CommerceOps_Sc9 folder also .. any idea in this
LikeLike
Hi Bapi,
Please ensure the local account is available (especially checking the password for the case you already installed the previous version of Sitecore Commerce) in Step 16
UserAccount = @{
Domain = $Env:COMPUTERNAME
UserName = ‘WindowUserName’
Password = ‘WindowUserPassword’
}
LikeLike
Yes, I have also encountered this problem, wasted a lot of time, the landlord said is too vague, can you give a clear indication.
LikeLike
Can you ensure to follow “1.3.1 Hosting environment requirements” in Installation Guide ?
LikeLike
In addition to my use of SQL server2017, the environment is basically the same.
LikeLike
PS>TerminatingError(Get-Content): “The running command stopped because the preference variable “ErrorActionPreference” or common parameter is set to Stop: Cannot find path ‘C:\inetpub\wwwroot\CommerceOps_Sc9\wwwroot\config.json’ because it does not exist.”
[TIME] 00:00:49
Transcript stopped, output file is C:\sc9.0.1_com_install\SIF\CommerceEngine.Deploy.180503 (2).log
Command start time: 20180503171304
PS>TerminatingError(Invoke-DeployCommerceContentTask): “The running command stopped because the preference variable “ErrorActionPreference” or common parameter is set to Stop: Cannot find path ‘C:\inetpub\wwwroot\CommerceOps_Sc9\wwwroot\config.json’ because it does not exist.”
Install-SitecoreConfiguration : Cannot find path ‘C:\inetpub\wwwroot\CommerceOps_Sc9\wwwroot\config.json’ because it
does not exist.
At C:\sc9.0.1_com_install\SIF\sc9_com_install.ps1:82 char:2
+ Install-SitecoreConfiguration @params
+ ~~~~~~~~~~~~~~~~~~~~~~~~~~~~~~~~~~~~~
+ CategoryInfo : NotSpecified: (:) [Write-Error], WriteErrorException
+ FullyQualifiedErrorId : Microsoft.PowerShell.Commands.WriteErrorException,Install-SitecoreConfiguration
Install-SitecoreConfiguration : Cannot find path
‘C:\inetpub\wwwroot\CommerceOps_Sc9\wwwroot\config.json’ because it does not exist.
At C:\sc9.0.1_com_install\SIF\sc9_com_install.ps1:82 char:2
+ Install-SitecoreConfiguration @params
+ ~~~~~~~~~~~~~~~~~~~~~~~~~~~~~~~~~~~~~
+ CategoryInfo : NotSpecified: (:) [Write-Error], WriteErrorException
+ FullyQualifiedErrorId : Microsoft.PowerShell.Commands.WriteErrorException,Install-Site
coreConfiguration
[TIME] 00:01:13
Windows PowerShell transcript end
End time: 20180503171305
LikeLike
Very likely in Step 14, you created “Sitecore.Commerce.Engine.2.1.55.zip” in a wrong directory structure so the operation was stopped due to incorrect parameters.
LikeLike
[———————- DisableCsrfValidation : DisableCsrfValidation ———————-]
[————————— GetIdServerToken : GetIdServerToken —————————]
Get Token From Sitecore.IdentityServer
Install-SitecoreConfiguration :
Service Unavailable
Service Unavailable
HTTP Error 503. The service is unavailable.
At C:\Program Files\WindowsPowerShell\Modules\SitecoreInstallFramework\1.2.1\Public\Install-S
itecoreConfiguration.ps1:253 char:21
+ & $entry.Task.Command @paramSet | Out-Default
+ ~~~~~~~~~~~~~~~~~~~~~~~~~~~~~~~
+ CategoryInfo : NotSpecified: (:) [Write-Error], WriteErrorException
+ FullyQualifiedErrorId : Microsoft.PowerShell.Commands.WriteErrorException,Install-Site
coreConfiguration
LikeLike
I had the same issue. How did you resolve this error?
LikeLike
Normally, there are 03 cases:
1) ensure to install .Net Core stuffs
2) correct connection string in “C:\inetpub\wwwroot\SitecoreIdentityServer\wwwroot\appsettings.json” and then do IIS reset
3) correct the application pool of SitecoreIdentityServer site in IIS
LikeLike
Thank you for the warning you gave me before, but then I have the following question, can you help me to solve it?
LikeLike
You can send your issues (with screenshots if possible) to viet.hoang.sitecore@gmail.com so that I have a chance to understand your problem and be able to suggest the solution.
LikeLike
OK,Thanks
LikeLike
Hello Viet,
This is really helpful. I’ve followed your steps and successfully configured sxc9-update-1. After the installation, I am trying to access the APIs using postman but I am getting 404 while accessing https://localhost:5000 also found there isn’t any log file generated for Authoring site. I am following https://tothecore.sk/2018/03/27/authorizing-requests-in-postman-for-sitecore-experience-commerce-9/ article to verify the things but haven’t found any proper direction.
Do you’ve any idea about it?
LikeLike
Normally, that log folder is “C:\inetpub\wwwroot\CommerceAuthoring_Sc9\wwwroot\logs” and you may want to have a look at https://tothecore.sk/2018/07/25/setting-up-development-environment-with-postman-and-sitecore-experience-commerce-sxc-9/
LikeLike
Thanks, Viet. I already tried that but still getting the same issue. I’ll give another deep dive.
Again Thank you!
LikeLike
Thank you for the great post, and for covering most of the issues.
However regarding the error:
“Install-SitecoreConfiguration : Cannot find path ‘C:\inetpub\wwwroot\CommerceOps_Sc9\wwwroot\config.json’ because it
does not exist.”
the folder structure was missed up, because there was unnecessary folder named “Sitecore.Commerce.Engine.2.0.1922” inside the archive “Sitecore.Commerce.Engine.2.0.1922.zip” while zipping the folder, however for fixing this I needed to open the folder, then select all the files inside, then create an archive from them (not by selecting the folder then create archive). this worked for me.
Thanks a lot.
LikeLiked by 1 person
[AggregateException: One or more exceptions occurred while processing the subscribers to the 'item:saved'
event.]
Sitecore.Events.EventSubscribers.RaiseEvent(String eventName, Object[] parameters, EventResult result) +1858
Sitecore.Events.Event.RaiseEvent(String eventName, Object[] parameters) +390
Sitecore.Events.Event.RaiseItemSaved(Object sender, ItemSavedEventArgs args) +291
System.EventHandler
1.Invoke(Object sender, TEventArgs e) +02.RaiseEvent(EventHandlerSitecore.Data.Engines.EngineCommand
1 handlers, Func2 argsCreator) +135Sitecore.Data.Engines.EngineCommand
2.Execute() +2021 sink) +583Sitecore.Data.Engines.DataEngine.SaveItem(Item item) +229
Sitecore.Pipelines.ItemProvider.SaveItem.TriggerDataEngine.Process(SaveItemArgs args) +98
(Object , Object ) +14
Sitecore.Pipelines.CorePipeline.Run(PipelineArgs args) +490
Sitecore.Data.Managers.DefaultItemManager.SaveItem(Item item) +127
Sitecore.Data.Items.ItemEditing.AcceptChanges(Boolean updateStatistics, Boolean silent) +126
Sitecore.Data.Items.ItemEditing.EndEdit(Boolean updateStatistics, Boolean silent) +28
Sitecore.Install.Items.VersionInstaller.InstallVersion(Item version) +343
Sitecore.Install.Items.VersionInstaller.PasteVersion(XmlNode versionXml, Item target, VersionInstallMode mode,
IProcessingContext context, Boolean removeOtherVersions) +126
Sitecore.Install.Items.ItemInstaller.InstallEntry(PackageEntry entry) +1316
Sitecore.Install.Items.ItemInstaller.Flush() +156
Sitecore.Install.Framework.SinkDispatcher.Flush() +105
Sitecore.Install.Utils.EntrySorter.Flush() +234
Sitecore.Install.Zip.PackageReader.Populate(ISink
Sitecore.Install.Utils.EntrySorter.Populate(ISink
1 sink) +861 source,Sitecore.Install.Installer.InstallPackage(String path, Boolean registerInstallation, ISource
IProcessingContext context) +444
Sitecore.Install.Installer.InstallPackage(String path, IProcessingContext context) +72
ASP.siteutilitypages_installmodules_aspx.Install(String package) in
c:\inetpub\wwwroot\TVSshop\SiteUtilityPages\InstallModules.aspx:54
ASP.siteutilitypages_installmodules_aspx.Page_Load(Object sender, EventArgs e) in
c:\inetpub\wwwroot\TVSshop\SiteUtilityPages\InstallModules.aspx:36
System.Web.UI.Control.OnLoad(EventArgs e) +99
System.Web.UI.Control.LoadRecursive() +154
System.Web.UI.Page.ProcessRequestMain(Boolean includeStagesBeforeAsyncPoint, Boolean includeStagesAfterAsyncPoint)
+4082
in sitecore installation
LikeLike